
Introduction to Zombie Brain Cheesecake Bites
As a busy mom, I know how challenging it can be to whip up something fun and festive, especially around Halloween. That’s why I absolutely adore these Zombie Brain Cheesecake Bites! They’re not just a treat; they’re a delightful conversation starter that will impress your loved ones. With their spooky appearance and creamy filling, these bites are perfect for any creepy-themed party or just a fun family dessert night. Plus, they’re quick to make, allowing you to spend more time enjoying the festivities and less time in the kitchen. Let’s dive into this deliciously eerie recipe!
Print
Zombie Brain Cheesecake Bites: A Creepy Delight Awaits!
- Total Time: 2 hours 20 minutes
- Yield: 12 bites
- Diet: Vegetarian
Description
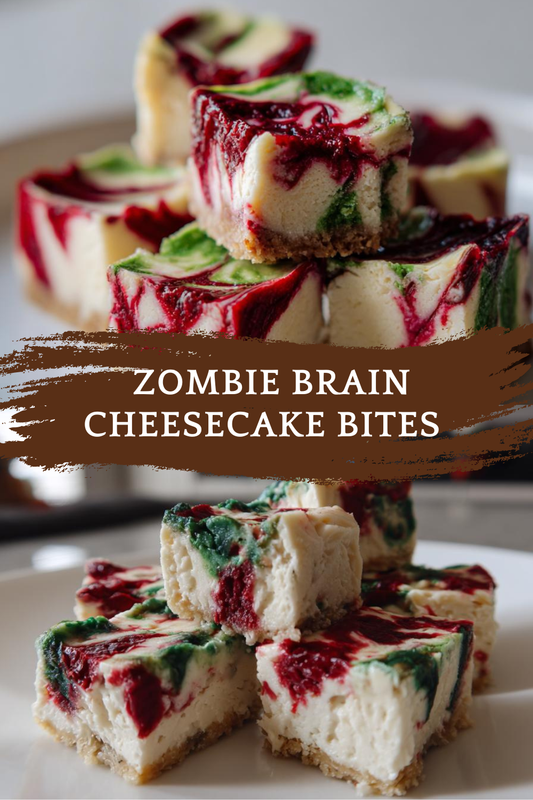
Zombie Brain Cheesecake Bites are a fun and spooky dessert perfect for Halloween or any creepy-themed party. These bite-sized treats are made to look like brains, combining a delicious cheesecake filling with a vibrant red raspberry sauce.
Ingredients
- 8 oz cream cheese, softened
- 1/2 cup powdered sugar
- 1 tsp vanilla extract
- 1 cup whipped cream
- 1/2 cup raspberry sauce
- 1 package of mini graham cracker crusts
- Red food coloring (optional)
Instructions
- In a mixing bowl, beat the softened cream cheese until smooth.
- Add powdered sugar and vanilla extract, mixing until well combined.
- Fold in the whipped cream gently until the mixture is light and fluffy.
- If desired, add a few drops of red food coloring to enhance the color.
- Spoon the cheesecake mixture into the mini graham cracker crusts, filling them generously.
- Refrigerate for at least 2 hours to set.
- Before serving, drizzle raspberry sauce over the top to create a ‘bloody’ effect.
- Serve chilled and enjoy the creepy delight!
Notes
- For a more intense flavor, consider adding a splash of lemon juice to the cheesecake mixture.
- These bites can be made a day in advance and stored in the refrigerator.
- Feel free to use store-bought raspberry sauce or make your own.
- Prep Time: 20 minutes
- Cook Time: 0 minutes
- Category: Dessert
- Method: No-bake
- Cuisine: American
Why You’ll Love This Zombie Brain Cheesecake Bites
These Zombie Brain Cheesecake Bites are a game-changer for busy moms like us! They’re incredibly easy to make, requiring no baking at all. In just 20 minutes of prep time, you can create a spooky dessert that’s sure to wow your guests. The creamy cheesecake filling paired with the vibrant raspberry sauce is a flavor explosion that will leave everyone wanting more. Plus, they’re perfect for any Halloween gathering!
Ingredients for Zombie Brain Cheesecake Bites
Gathering the right ingredients is key to making these delightful Zombie Brain Cheesecake Bites. Here’s what you’ll need:
- Cream Cheese: The star of the show! Softened cream cheese gives these bites their rich and creamy texture.
- Powdered Sugar: This sweetener adds just the right amount of sweetness to balance the tanginess of the cream cheese.
- Vanilla Extract: A splash of vanilla enhances the flavor, making each bite taste even more indulgent.
- Whipped Cream: Light and fluffy, whipped cream adds volume and a cloud-like texture to the cheesecake filling.
- Raspberry Sauce: This vibrant sauce not only adds a pop of color but also creates that spooky ‘bloody’ effect on top.
- Mini Graham Cracker Crusts: These pre-made crusts save time and provide a crunchy base that complements the creamy filling.
- Red Food Coloring (optional): A few drops can intensify the eerie look of your cheesecake bites, making them even more fun!
For exact measurements, check the bottom of the article where you can find everything listed for easy printing. Happy cooking!
How to Make Zombie Brain Cheesecake Bites
Now that we have our ingredients ready, let’s dive into the fun part—making these Zombie Brain Cheesecake Bites! Follow these simple steps, and you’ll have a spooky treat that’s sure to impress.
Step 1: Prepare the Cream Cheese Mixture
Start by beating the softened cream cheese in a mixing bowl. Use an electric mixer for the best results. You want it to be smooth and creamy, like a fluffy cloud. This step is crucial because it sets the foundation for your cheesecake filling. If the cream cheese isn’t smooth, your bites will have an uneven texture.
Step 2: Mix in Sugar and Vanilla
Next, add the powdered sugar and vanilla extract to the cream cheese. Mix until everything is well combined. The sugar sweetens the mixture, while the vanilla adds a warm, inviting flavor. Trust me, this combination is what makes your cheesecake bites irresistible!
Step 3: Fold in Whipped Cream
Now, it’s time to fold in the whipped cream. Gently add it to the mixture and use a spatula to combine. Be careful not to overmix; you want to keep that light and airy texture. This step is what gives your cheesecake bites that delightful fluffiness that melts in your mouth.
Step 4: Add Food Coloring
If you’re feeling adventurous, add a few drops of red food coloring to the mixture. This optional step enhances the spooky vibe of your Zombie Brain Cheesecake Bites. Just a little bit goes a long way, so start with a drop or two and mix until you achieve your desired shade of creepy!
Step 5: Fill the Crusts
Grab your mini graham cracker crusts and spoon the cheesecake mixture into each one. Fill them generously, but don’t overfill—leave a little room for the raspberry sauce later. This is where the fun begins, as you create your little brain-shaped treats!
Step 6: Refrigerate to Set
Once filled, place the cheesecake bites in the refrigerator. Let them chill for at least 2 hours. This step is essential for the bites to set properly. Plus, it gives you time to plan your spooky presentation!
Step 7: Drizzle Raspberry Sauce
Before serving, take your raspberry sauce and drizzle it over the top of each cheesecake bite. This creates that ‘bloody’ effect that makes these treats so fun and festive. It’s the finishing touch that will have everyone talking about your deliciously creepy creation!
Tips for Success
- Make sure your cream cheese is at room temperature for easy mixing.
- Use a spatula to gently fold in the whipped cream to maintain fluffiness.
- Chill the bites overnight for an even firmer texture.
- Experiment with different fruit sauces for a unique twist.
- Keep extra raspberry sauce on hand for serving—it’s a crowd favorite!
Equipment Needed
- Mixing Bowl: A large bowl for combining ingredients. A sturdy glass or ceramic bowl works well.
- Electric Mixer: For beating the cream cheese. A whisk can be used, but it requires more effort.
- Spatula: Essential for folding in whipped cream and filling crusts. A silicone spatula is ideal.
- Refrigerator: To chill the cheesecake bites. A cooler can work if you’re short on space.
Variations
- Chocolate Drizzle: Swap the raspberry sauce for a rich chocolate sauce for a different flavor profile.
- Fruit Swaps: Try using strawberry or blueberry sauce instead of raspberry for a fruity twist.
- Gluten-Free Option: Use gluten-free mini crusts to make these bites suitable for gluten-sensitive guests.
- Vegan Version: Substitute cream cheese with a vegan alternative and use coconut whipped cream for a dairy-free treat.
- Nutty Crunch: Add crushed nuts or cookie crumbs on top for an extra layer of texture and flavor.
Serving Suggestions
- Pair these Zombie Brain Cheesecake Bites with spooky-themed cocktails or mocktails for a festive touch.
- Serve on a black platter to enhance the eerie vibe of your Halloween gathering.
- Garnish with fresh mint leaves for a pop of color and a refreshing contrast.
- Include a side of extra raspberry sauce for dipping—it’s a crowd-pleaser!
FAQs about Zombie Brain Cheesecake Bites
Can I make Zombie Brain Cheesecake Bites in advance?
Absolutely! These cheesecake bites can be made a day ahead. Just store them in the refrigerator until you’re ready to serve. This makes them a perfect option for busy moms planning a Halloween party!
What can I use instead of raspberry sauce?
If raspberry isn’t your favorite, feel free to swap it out! Strawberry or blueberry sauce works wonderfully too. You can even make a homemade fruit sauce for a personal touch.
How do I store leftover cheesecake bites?
Store any leftovers in an airtight container in the refrigerator. They’ll stay fresh for up to three days, but I doubt they’ll last that long!
Can I freeze these cheesecake bites?
While I recommend enjoying them fresh, you can freeze them for up to a month. Just make sure to wrap them tightly to prevent freezer burn. Thaw them in the fridge before serving.
Are these Zombie Brain Cheesecake Bites suitable for kids?
Definitely! Kids love the fun, spooky appearance, and the creamy taste is a hit. Just keep an eye on the food coloring if you’re concerned about mess!
Final Thoughts
Creating these Zombie Brain Cheesecake Bites is more than just making a dessert; it’s about bringing joy and laughter to your family and friends. The smiles on their faces as they take a bite of these spooky treats are priceless. Plus, the ease of preparation means you can focus on what truly matters—making memories together. Whether it’s a Halloween party or a cozy family night, these bites are sure to be a hit. So, roll up your sleeves, embrace the fun, and let your creativity shine in the kitchen. Happy haunting and happy eating!