
Introduction to Spooky Halloween Cinnamon Rolls
As the leaves turn and the air gets crisp, I find myself craving something warm and delightful. That’s where these Spooky Halloween Cinnamon Rolls come in! They’re not just a treat; they’re a fun way to celebrate the season with your loved ones. Perfect for busy mornings or a festive gathering, these rolls are a quick solution that will impress everyone. Imagine the smiles on your family’s faces as they dig into these deliciously spooky treats. Trust me, they’ll be the highlight of your Halloween festivities!
Print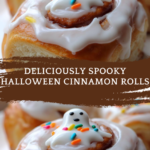
Spooky Halloween Cinnamon Rolls You Can’t Resist!
- Total Time: 1 hour 55 minutes
- Yield: 12 rolls
- Diet: Vegetarian
Description
Delicious and festive cinnamon rolls perfect for Halloween, decorated to look spooky and fun.
Ingredients
- 2 cups all-purpose flour
- 1/2 cup granulated sugar
- 1/2 cup milk
- 1/4 cup unsalted butter, melted
- 1 packet active dry yeast
- 1 teaspoon vanilla extract
- 1/2 teaspoon salt
- 1 tablespoon ground cinnamon
- 1/4 cup powdered sugar
- 2 tablespoons water
- Black food coloring (optional)
- Edible eyes (for decoration)
Instructions
- In a bowl, combine warm milk and yeast, let it sit for 5 minutes.
- Add melted butter, sugar, vanilla, and salt to the yeast mixture.
- Gradually add flour and knead until a dough forms.
- Let the dough rise in a warm place for about 1 hour.
- Roll out the dough and spread a mixture of cinnamon and sugar on top.
- Roll the dough tightly and cut into individual rolls.
- Place rolls on a baking sheet and let them rise for another 30 minutes.
- Bake at 350°F (175°C) for 20-25 minutes until golden brown.
- Mix powdered sugar with water and food coloring to create a glaze.
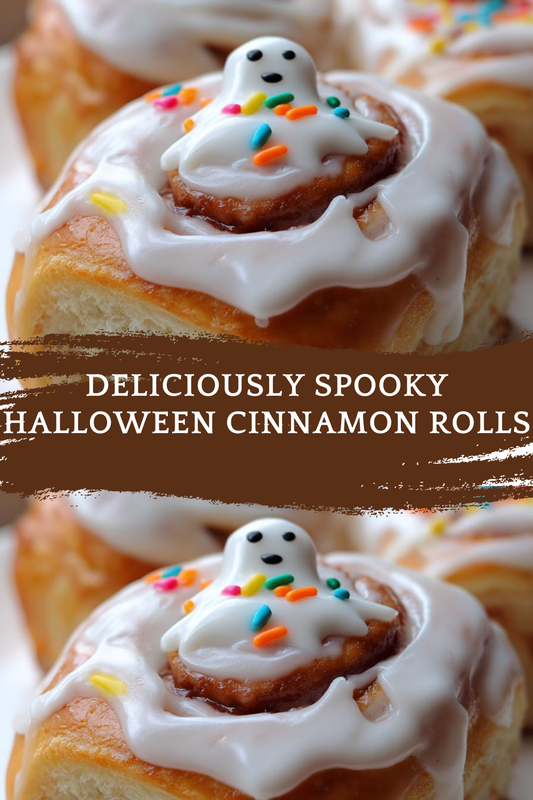
- Drizzle the glaze over the cooled rolls and decorate with edible eyes.
Notes
- For a more intense cinnamon flavor, increase the amount of cinnamon used.
- These rolls can be made ahead and frozen before baking.
- Feel free to use different colors for the glaze to match your Halloween theme.
- Prep Time: 30 minutes
- Cook Time: 25 minutes
- Category: Dessert
- Method: Baking
- Cuisine: American
Why You’ll Love This Spooky Halloween Cinnamon Rolls
These Spooky Halloween Cinnamon Rolls are a delightful blend of ease and flavor. They come together quickly, making them perfect for busy moms like us. The warm, gooey cinnamon filling is a hug in every bite, while the fun decorations bring a smile to everyone’s face. Plus, they’re a fantastic way to get the kids involved in the kitchen. Who wouldn’t love a little spooky fun while baking?
Ingredients for Spooky Halloween Cinnamon Rolls
Gathering the right ingredients is half the fun! Here’s what you’ll need to whip up these Spooky Halloween Cinnamon Rolls:
- All-purpose flour: The backbone of your dough, giving it structure and chewiness.
- Granulated sugar: Sweetens the dough and filling, making every bite irresistible.
- Milk: Adds moisture and richness, helping the dough rise beautifully.
- Unsalted butter: For that rich, buttery flavor that makes everything better.
- Active dry yeast: The magic ingredient that makes your rolls fluffy and light.
- Vanilla extract: A splash of warmth and sweetness that elevates the flavor.
- Salt: Enhances all the flavors and balances the sweetness.
- Ground cinnamon: The star of the show! It brings that cozy, warm spice we all love.
- Powdered sugar: For the glaze that adds a sweet finishing touch.
- Water: Helps to create the perfect glaze consistency.
- Black food coloring (optional): For a spooky twist on your glaze, making it extra festive.
- Edible eyes: These little decorations turn your rolls into fun, spooky creatures!
For exact measurements, check the bottom of the article where you can find everything listed for easy printing. Happy baking!
How to Make Spooky Halloween Cinnamon Rolls
Now that you have your ingredients ready, let’s dive into the fun part—making these Spooky Halloween Cinnamon Rolls! Follow these simple steps, and you’ll have a batch of deliciously spooky treats in no time.
Step 1: Prepare the Yeast Mixture
Start by warming your milk until it’s just warm to the touch, not hot. Sprinkle the active dry yeast into the milk and give it a gentle stir. Let it sit for about 5 minutes. This step is crucial; it wakes up the yeast, making your rolls fluffy and light!
Step 2: Mix Wet Ingredients
Once your yeast is bubbly and frothy, it’s time to add the melted butter, granulated sugar, vanilla extract, and salt. Stir everything together until well combined. The aroma will be heavenly, and you’ll know you’re on the right track!
Step 3: Form the Dough
Gradually add the all-purpose flour to the wet mixture. I like to do this in batches to avoid a flour explosion! Knead the dough until it’s smooth and elastic. This should take about 5-7 minutes. If the dough is too sticky, sprinkle a little more flour as needed.
Step 4: Let the Dough Rise
Place your dough in a greased bowl, cover it with a clean kitchen towel, and let it rise in a warm spot for about 1 hour. You want it to double in size. This is the perfect time to sip on a warm drink and enjoy the delightful smell of baking!
Step 5: Roll Out the Dough
After the dough has risen, punch it down gently to release the air. Roll it out on a floured surface into a rectangle. Spread a generous layer of cinnamon and sugar mixture over the dough. The sweet scent will fill your kitchen, making it hard to resist!
Step 6: Shape the Rolls
Starting from one end, roll the dough tightly into a log. Use a sharp knife to cut the log into individual rolls. I usually aim for about 12 rolls. Place them cut-side up on a baking sheet lined with parchment paper.
Step 7: Second Rise
Cover the rolls with a towel and let them rise again for about 30 minutes. This second rise is essential for that fluffy texture. While you wait, you can preheat your oven to 350°F (175°C).
Step 8: Bake the Rolls
Once the rolls have puffed up, pop them in the oven. Bake for 20-25 minutes until they’re golden brown. The smell will be irresistible, and you might find it hard to wait for them to cool!
Step 9: Prepare the Glaze
While the rolls are baking, mix the powdered sugar with water and a few drops of black food coloring in a bowl. Adjust the consistency until it’s pourable but not too runny. This glaze will add a spooky touch to your rolls!
Step 10: Decorate the Rolls
Once the rolls have cooled slightly, drizzle the glaze over them. Get creative! Add edible eyes to make them look extra spooky. Your Spooky Halloween Cinnamon Rolls are now ready to be devoured!
Tips for Success
- Make sure your milk is warm, not hot, to activate the yeast properly.
- Don’t rush the rising times; they’re key for fluffy rolls.
- Use a sharp knife to cut the rolls for clean edges.
- Feel free to experiment with different colors for the glaze.
- For a fun twist, add sprinkles or other spooky decorations!
Equipment Needed
- Mixing bowl: A large bowl for combining ingredients. A sturdy pot works too!
- Rolling pin: Essential for rolling out the dough. A wine bottle can substitute in a pinch!
- Baking sheet: For baking the rolls. A casserole dish can work as an alternative.
- Sharp knife: For cutting the rolls. A pizza cutter is a fun option!
- Kitchen towel: To cover the dough while it rises. Any clean cloth will do!
Variations
- Pumpkin Spice: Add 1/2 cup of pumpkin puree to the dough for a seasonal twist.
- Nutty Delight: Incorporate chopped nuts like pecans or walnuts into the filling for added crunch.
- Gluten-Free: Substitute all-purpose flour with a gluten-free blend for a delicious alternative.
- Chocolate Swirl: Mix in chocolate chips with the cinnamon and sugar for a decadent treat.
- Vegan Option: Use plant-based milk and butter to make these rolls vegan-friendly.
Serving Suggestions
- Pair your Spooky Halloween Cinnamon Rolls with a warm cup of apple cider for a cozy treat.
- Serve them alongside a festive fruit platter for a colorful contrast.
- For a fun presentation, arrange the rolls on a spooky-themed platter.
- Consider adding a scoop of vanilla ice cream for an indulgent dessert.
FAQs about Spooky Halloween Cinnamon Rolls
Can I make these Spooky Halloween Cinnamon Rolls ahead of time?
Absolutely! You can prepare the rolls and freeze them before baking. Just let them rise, then wrap them tightly and store in the freezer. When you’re ready, let them thaw and rise again before baking. It’s a great time-saver for busy days!
What if I don’t have black food coloring?
No worries! You can skip the food coloring or use other colors to match your Halloween theme. Orange or purple glazes can be just as festive. Get creative with what you have on hand!
How do I store leftover cinnamon rolls?
Store any leftover Spooky Halloween Cinnamon Rolls in an airtight container at room temperature for up to 2 days. For longer storage, pop them in the fridge for up to a week. Just reheat them in the microwave for a few seconds before enjoying!
Can I use a different filling for the rolls?
Definitely! Feel free to experiment with different fillings like Nutella, cream cheese, or even fruit preserves. The possibilities are endless, and it’s a fun way to customize your rolls!
Are these cinnamon rolls suitable for kids?
Yes! These Spooky Halloween Cinnamon Rolls are perfect for kids. They can help with decorating and will love the fun, spooky theme. Plus, they’re delicious, making them a hit at any Halloween gathering!
Final Thoughts
Making these Spooky Halloween Cinnamon Rolls is more than just baking; it’s about creating memories with your loved ones. The joy of watching the dough rise, the sweet aroma filling your home, and the laughter shared while decorating each roll brings a warmth that’s hard to beat. Whether you’re hosting a Halloween party or enjoying a cozy family breakfast, these rolls are sure to be a hit. So, roll up your sleeves, gather your family, and dive into this delightful culinary adventure. Trust me, the smiles and satisfaction will be worth every moment spent in the kitchen!