

Introduction to Spooktacular Frankenstein Rice Krispie Treats for an Easy, No-Fuss Halloween Treat
As the leaves turn and the air gets crisp, Halloween sneaks up on us faster than a ghost in the night. If you’re like me, juggling work, family, and a million other things, you need a quick solution for a busy day. That’s where these Spooktacular Frankenstein Rice Krispie Treats come in! They’re not just easy to whip up; they’re also a delightful way to impress your loved ones. With just a few ingredients and minimal fuss, you’ll have a fun Halloween treat that everyone will adore. Let’s dive into this deliciously spooky adventure!
Print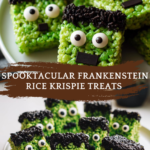
Spooktacular Frankenstein Rice Krispie Treats Made Easy!
- Total Time: 25 minutes
- Yield: 12 servings
- Diet: Vegetarian
Description
These Spooktacular Frankenstein Rice Krispie Treats are a fun and easy Halloween treat that kids and adults will love.
Ingredients
- 3 tablespoons butter
- 1 package (10 oz) marshmallows
- 6 cups Rice Krispies cereal
- Green food coloring
- Chocolate frosting
- Black licorice
- Candy eyes
Instructions
- In a large saucepan, melt the butter over low heat.
- Add the marshmallows and stir until completely melted.
- Remove from heat and add a few drops of green food coloring, mixing until the desired color is achieved.
- Stir in the Rice Krispies cereal until well coated.
- Press the mixture into a greased 9×13 inch pan and let it cool.
- Once cooled, cut into rectangles to form the Frankenstein heads.
- Use chocolate frosting to create hair and mouth on each treat.
- Add candy eyes and pieces of black licorice for the bolts.
Notes
- For a more vibrant green, add more food coloring as needed.
- Store in an airtight container to keep them fresh.
- These treats can be made a day in advance.
- Prep Time: 15 minutes
- Cook Time: 10 minutes
- Category: Dessert
- Method: No-Bake
- Cuisine: American
Why You’ll Love This Spooktacular Frankenstein Rice Krispie Treats for an Easy, No-Fuss Halloween Treat
These treats are a lifesaver for busy moms like me! They come together in just 25 minutes, making them perfect for last-minute Halloween parties or school events. Plus, the kids can help decorate, turning it into a fun family activity. With their gooey marshmallow goodness and playful design, these Spooktacular Frankenstein Rice Krispie Treats are sure to bring smiles and laughter to your Halloween celebrations!
Ingredients for Spooktacular Frankenstein Rice Krispie Treats
Gathering the right ingredients is half the fun! Here’s what you’ll need to create these delightful treats:
- Butter: This is the base for our gooey mixture. It adds richness and helps everything stick together.
- Marshmallows: The star of the show! They melt down to create that sweet, sticky goodness we all love.
- Rice Krispies cereal: These crispy little gems provide the perfect crunch and texture to balance the gooey marshmallows.
- Green food coloring: This is what transforms our treats into spooky Frankenstein heads! A few drops will do the trick.
- Chocolate frosting: Use this to create the hair and mouth. It adds a delicious chocolatey flavor that pairs perfectly with the sweetness.
- Black licorice: These make great bolts for Frankenstein! If you’re not a fan, you can substitute with chocolate-covered almonds or even pretzel sticks.
- Candy eyes: These are the finishing touch that brings your Frankenstein to life! You can find them at most grocery stores or online.
For exact quantities, check the bottom of the article where you can find everything listed for easy printing. Happy cooking!
How to Make Spooktacular Frankenstein Rice Krispie Treats for an Easy, No-Fuss Halloween Treat
Step 1: Melt the Butter
Start by grabbing a large saucepan. Place it on the stove over low heat and add your butter. Keep an eye on it, stirring occasionally, until it melts completely. The key here is to melt it slowly; we don’t want it to burn! Trust me, burnt butter is not the flavor we’re going for.
Step 2: Add Marshmallows
Once the butter is melted, it’s time to add the marshmallows. Pour them into the saucepan and stir continuously. You want to keep stirring until they’re completely melted and form a gooey mixture. This is where the magic begins! The sweet aroma will fill your kitchen, making it hard to resist sneaking a taste.
Step 3: Color the Mixture
Now, remove the saucepan from the heat. Grab your green food coloring and add a few drops to the melted marshmallow mixture. Stir well until you achieve that perfect Frankenstein green. If you want a more vibrant color, feel free to add a bit more. It’s Halloween, after all!
Step 4: Combine with Rice Krispies
Next, it’s time to add the Rice Krispies cereal. Pour them into the gooey marshmallow mixture and stir until every piece is well coated. This step is crucial for that delightful crunch we all love. The mixture should be sticky but manageable, so don’t be afraid to get your hands in there if needed!
Step 5: Press into Pan
Now, grab a greased 9×13 inch pan. Transfer the mixture into the pan and press it down firmly with your hands or a spatula. Make sure it’s evenly spread out. Let it cool for about 10-15 minutes. This is the hardest part—waiting! But trust me, it’ll be worth it.
Step 6: Cut into Shapes
Once the mixture has cooled, it’s time to cut it into shapes. Use a sharp knife to slice the cooled mixture into rectangles. These will be your Frankenstein heads! Try to make them uniform in size for a neat presentation. You can even get creative and shape them into other spooky figures if you’re feeling adventurous!
Step 7: Decorate with Frosting
Now comes the fun part—decorating! Take your chocolate frosting and use it to create hair and a mouth on each treat. You can use a piping bag for precision or just a knife if you prefer a more rustic look. The chocolate adds a delicious contrast to the sweet green treats.
Step 8: Add Finishing Touches
Finally, it’s time to bring your Frankenstein treats to life! Add candy eyes on top for that adorable, spooky look. Then, use pieces of black licorice to create bolts on the sides. These little details make all the difference and will have everyone smiling at your creation!
Tips for Success
- Use fresh marshmallows for the best gooey texture.
- Grease your hands with butter when pressing the mixture into the pan to prevent sticking.
- For easier cutting, let the treats cool completely before slicing.
- Experiment with different colors for a fun twist—how about purple or orange?
- Store leftovers in an airtight container to keep them fresh and chewy.
Equipment Needed
- Large saucepan: A non-stick option works best for easy cleanup.
- Spatula: Use a silicone spatula for mixing and pressing the mixture.
- 9×13 inch pan: Any baking dish will do, just make sure it’s greased.
- Sharp knife: A serrated knife can help with cutting the treats neatly.
Variations of Spooktacular Frankenstein Rice Krispie Treats
- Chocolate Rice Krispie Treats: Swap out some of the Rice Krispies for chocolate-flavored cereal for a delicious twist.
- Nut-Free Version: If allergies are a concern, ensure all ingredients are nut-free, especially the chocolate frosting and licorice.
- Vegan Option: Use vegan butter and marshmallows to create a plant-based version that everyone can enjoy.
- Gluten-Free Treats: Make sure to use gluten-free Rice Krispies for a safe treat for those with gluten sensitivities.
- Fruit Additions: Mix in some mini marshmallows or dried fruit for added texture and flavor.
Serving Suggestions for Spooktacular Frankenstein Rice Krispie Treats
- Pair these treats with a spooky punch or apple cider for a festive drink.
- Serve on a Halloween-themed platter for an eye-catching presentation.
- Include some fresh fruit like apple slices or grapes for a balanced snack.
- Set up a decorating station with extra candy for kids to personalize their treats.
- Wrap individual treats in clear bags tied with orange ribbons for party favors.
FAQs about Spooktacular Frankenstein Rice Krispie Treats for an Easy, No-Fuss Halloween Treat
Can I make these treats ahead of time?
Absolutely! These Spooktacular Frankenstein Rice Krispie Treats can be made a day in advance. Just store them in an airtight container to keep them fresh and chewy.
What if I don’t have green food coloring?
No worries! You can use other colors to create a fun twist. Purple or orange would be perfect for Halloween, too. Just remember, it’s all about having fun!
How do I store leftovers?
To keep your treats fresh, store them in an airtight container at room temperature. They should stay delicious for about 3-5 days, but I doubt they’ll last that long!
Can I use different toppings?
Definitely! Feel free to get creative with your toppings. You can use gummy worms, sprinkles, or even mini chocolate chips for a unique touch. The sky’s the limit!
Are these treats suitable for kids with allergies?
Check the labels on your ingredients to ensure they’re allergy-friendly. You can easily make nut-free or gluten-free versions by choosing the right products. Always best to double-check!
Final Thoughts
Creating these Spooktacular Frankenstein Rice Krispie Treats is more than just a recipe; it’s a chance to make memories with your loved ones. The joy on your kids’ faces as they decorate their spooky creations is priceless. Plus, the simplicity of this no-fuss Halloween treat means you can spend less time in the kitchen and more time enjoying the festivities. Whether you’re hosting a party or just looking for a fun activity, these treats are sure to bring smiles and laughter. So, roll up your sleeves and let the Halloween fun begin!