
Welcome to the delightful world of salami roses! If you’re like me, juggling a busy schedule while trying to impress family and friends can feel overwhelming. But fear not! These charming salami roses are a quick solution for a busy day, transforming simple ingredients into a stunning charcuterie display. They’re not just easy to make; they also add a touch of elegance to any gathering. Whether it’s a casual family dinner or a festive party, these little beauties will surely steal the show and make you feel like a culinary superstar!
Why You’ll Love This Salami Roses
These salami roses are a game-changer for busy moms and professionals alike. They’re incredibly easy to whip up, taking just 15 minutes from start to finish. Plus, they’re a feast for the eyes and the taste buds! With their savory flavor and elegant presentation, they’ll impress your guests without the stress. You’ll love how they elevate your charcuterie board, making every gathering feel special and memorable.
Ingredients for Salami Roses
Creating beautiful salami roses is all about using the right ingredients. Here’s what you’ll need:
- Salami slices: The star of the show! Choose your favorite type, whether it’s classic, spicy, or even a smoked variety for added flavor.
- Cheese (optional): Cubed cheese adds a creamy contrast. Think about using cheddar, gouda, or even a tangy goat cheese for a delightful twist.
- Olives (optional): These little gems bring a briny punch. Green or black olives work well, adding color and taste to your display.
- Fresh herbs (for garnish): A handful of fresh herbs like parsley or basil not only enhances the look but also adds a fresh aroma to your platter.
Feel free to mix and match these ingredients based on your preferences or what you have on hand. The exact quantities are listed at the bottom of the article for your convenience, making it easy to print and follow along!
How to Make Salami Roses
Step 1: Prepare the Salami
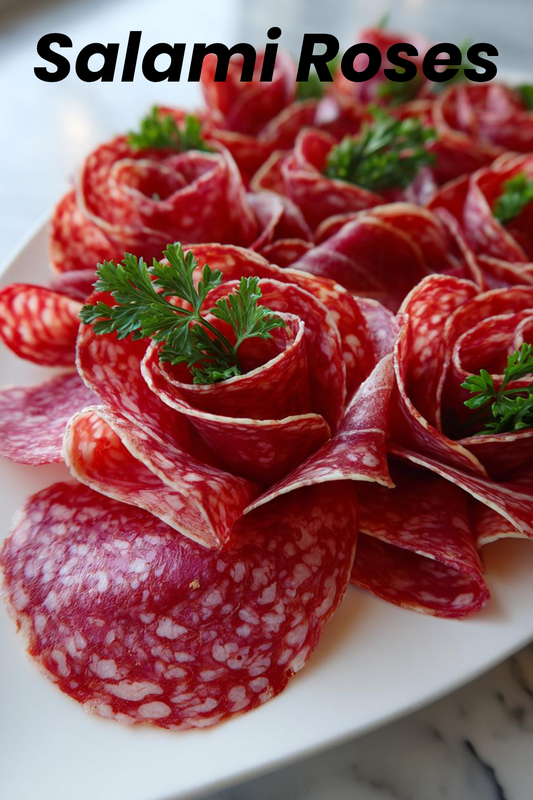
To start, take your salami slices and fold each one in half. This simple fold gives the roses a lovely shape. I like to chill the salami beforehand; it makes handling the slices much easier. You can use different types of salami for a colorful display. Think about mixing classic with spicy or even a smoked variety. The contrast in colors and flavors will make your salami roses pop on the plate!
Step 2: Create the First Rose
Now, let’s create the first rose! Place the folded slice in the center of your serving plate. This will be the heart of your rose. Next, take another slice and wrap it around the first slice, overlapping slightly. This technique creates that beautiful petal effect. Keep adding slices, wrapping them around the center, until you achieve your desired size. Don’t worry if it’s not perfect; each rose has its own charm, just like us!
Step 3: Build More Roses
Once you’ve mastered the first rose, it’s time to build more! Repeat the folding and wrapping process for each additional rose. I usually aim for about 10 to 12 roses, but you can make as many as you like. Arrange them in a circle or a cluster for a stunning visual effect. The more, the merrier! Your guests will be amazed at how quickly you’ve transformed simple salami into a work of art.
Step 4: Garnish and Present
Now for the fun part—garnishing! Sprinkle some cubed cheese around your salami roses for a creamy contrast. Add olives for a briny kick and a pop of color. Finally, toss in a handful of fresh herbs like parsley or basil. This not only enhances the look but also adds a delightful aroma. Your charcuterie display is now ready to impress! Serve it up and watch your guests’ eyes light up with joy.
Tips for Success
- Chill your salami slices before folding; it makes them easier to handle.
- Experiment with different salami types for unique flavors and colors.
- Use a mix of cheeses and olives to enhance taste and presentation.
- Don’t stress about perfection; each rose has its own beauty.
- Practice makes perfect—keep trying until you find your favorite style!
Equipment Needed
- Serving plate: A large platter works best, but any flat surface will do.
- Knife: Use a sharp knife for cutting cheese or olives, if needed.
- Cutting board: A clean surface for prepping your ingredients.
- Hands: Your best tools for shaping those beautiful roses!
Variations of Salami Roses
- Spicy Salami Roses: Use spicy or peppered salami for an extra kick. This adds a bold flavor that pairs beautifully with creamy cheeses.
- Vegetarian Option: Substitute salami with roasted red peppers or zucchini slices for a colorful, plant-based version that still looks stunning.
- Herbed Salami: Choose salami infused with herbs like basil or oregano for an aromatic twist that enhances the overall flavor profile.
- Cheese Variations: Experiment with different cheeses, such as smoked gouda or pepper jack, to complement the salami’s taste.
- Gluten-Free Crackers: Serve your salami roses with gluten-free crackers or breadsticks for a complete gluten-free charcuterie experience.
Serving Suggestions for Salami Roses
- Pair your salami roses with a selection of crunchy crackers for added texture.
- Serve alongside a refreshing white wine or sparkling water with lemon for a delightful drink option.
- Consider adding seasonal fruits like grapes or figs for a sweet contrast.
- Present on a wooden board for a rustic, inviting look.
- Include a small bowl of mustard or honey for dipping to enhance flavors.
FAQs about Salami Roses
Can I make salami roses ahead of time?
Absolutely! You can prepare your salami roses a few hours in advance. Just cover them with plastic wrap and refrigerate until you’re ready to serve. This way, you can enjoy more time with your guests!
What types of salami work best for these roses?
I recommend using a variety of salami for different flavors and colors. Classic, spicy, and even smoked salami can create a beautiful and tasty display. Mix and match to find your favorite combination!
How do I store leftover salami roses?
If you have any leftovers, store them in an airtight container in the fridge. They should stay fresh for a day or two. Just remember, the presentation might not be as stunning after a day, but they’ll still taste delicious!
Can I use other ingredients besides salami?
Of course! You can get creative with your ingredients. Try using roasted vegetables, cheese slices, or even fruits to create a unique twist on the traditional salami roses. The possibilities are endless!
Are salami roses gluten-free?
Yes, salami is naturally gluten-free! Just be sure to pair them with gluten-free crackers or breadsticks if you’re serving them to guests with dietary restrictions. Enjoy your beautiful charcuterie display worry-free!
Final Thoughts
Creating salami roses is more than just a cooking task; it’s a delightful experience that brings joy to both the maker and the guests. Each rose you craft is a little piece of art, showcasing your creativity and love for food. I cherish the moments spent arranging these beautiful displays, watching my family and friends marvel at the vibrant colors and elegant shapes. With just a few simple ingredients, you can elevate any gathering into a memorable occasion. So, roll up your sleeves, embrace the fun, and let your culinary creativity bloom with these stunning salami roses!
Print
Salami Roses: Create Stunning Charcuterie Displays Today!
- Total Time: 15 minutes
- Yield: 10-12 salami roses
- Diet: Gluten Free
Description
Learn how to create beautiful salami roses for your charcuterie boards, adding an elegant touch to your displays.
Ingredients
- Salami slices – 20 pieces
- Cheese (optional) – 1 cup, cubed
- Olives (optional) – 1/2 cup
- Fresh herbs (for garnish) – a handful
Instructions
- Start by taking a slice of salami and folding it in half.
- Place the folded slice in the center of your serving plate.
- Take another slice and wrap it around the first slice, creating a rose shape.
- Continue adding slices, overlapping them slightly, until you achieve your desired rose size.
- Repeat the process to create multiple roses.
- Garnish with cheese, olives, and fresh herbs for an attractive presentation.
Notes
- Use different types of salami for varied colors and textures.
- Chill the salami before shaping for easier handling.
- Pair with crackers and fruits for a complete charcuterie experience.
- Prep Time: 15 minutes
- Cook Time: 0 minutes
- Category: Appetizer
- Method: No-cook
- Cuisine: Italian