
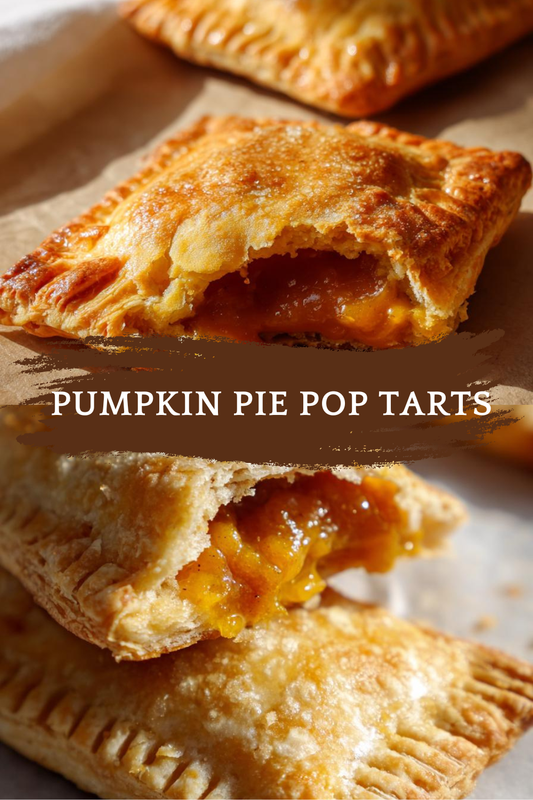
Introduction to Pumpkin Pie Pop Tarts
As the leaves turn and the air gets crisp, there’s nothing quite like the warm, inviting aroma of fall baking wafting through the house. That’s where my homemade Pumpkin Pie Pop Tarts come in! These delightful treats are not just a quick solution for busy mornings; they’re a way to bring a little joy to your family’s day. Imagine biting into a flaky crust filled with spiced pumpkin goodness, topped with a sweet glaze. It’s like a hug in pastry form! Trust me, these pop tarts will impress your loved ones and make your kitchen feel like a cozy autumn haven.
Print
Pumpkin Pie Pop Tarts: A Must-Try Fall Treat!
- Total Time: 45 minutes
- Yield: 8 pop tarts
- Diet: Vegetarian
Description
Delicious homemade Pumpkin Pie Pop Tarts filled with spiced pumpkin filling and topped with a sweet glaze, perfect for fall.
Ingredients
- 1 cup pumpkin puree
- 1/2 cup brown sugar
- 1 tsp cinnamon
- 1/2 tsp nutmeg
- 1/4 tsp ginger
- 1/4 tsp cloves
- 1 tbsp cornstarch
- 1 package pie crusts (2 crusts)
- 1 egg (for egg wash)
- 1 cup powdered sugar (for glaze)
- 2 tbsp milk (for glaze)
Instructions
- Preheat the oven to 375°F (190°C).
- In a bowl, mix pumpkin puree, brown sugar, cinnamon, nutmeg, ginger, cloves, and cornstarch until well combined.
- Roll out the pie crusts and cut them into rectangles.
- Place a spoonful of the pumpkin filling on half of the rectangles.
- Cover with the remaining rectangles and seal the edges with a fork.
- Brush the tops with egg wash.
- Bake for 20-25 minutes or until golden brown.
- In a separate bowl, mix powdered sugar and milk to make the glaze.
- Drizzle the glaze over the cooled pop tarts before serving.
Notes
- For a more intense flavor, let the filling sit for a few hours before using.
- These pop tarts can be stored in an airtight container for up to 3 days.
- Feel free to add chocolate chips or nuts to the filling for extra texture.
- Prep Time: 20 minutes
- Cook Time: 25 minutes
- Category: Dessert
- Method: Baking
- Cuisine: American
Why You’ll Love This Pumpkin Pie Pop Tarts
These Pumpkin Pie Pop Tarts are a game-changer for busy moms and professionals alike. They’re incredibly easy to make, taking just 45 minutes from start to finish. The taste? Oh, it’s like autumn on a plate! With a spiced pumpkin filling and a sweet glaze, they’re sure to satisfy your cravings. Plus, they’re perfect for breakfast, snacks, or even dessert, making them a versatile addition to your fall repertoire.
Ingredients for Pumpkin Pie Pop Tarts
Gathering the right ingredients is the first step to creating these delightful Pumpkin Pie Pop Tarts. Here’s what you’ll need:
- Pumpkin puree: This is the star of the show! It gives the filling its rich flavor and creamy texture. You can use canned or homemade puree.
- Brown sugar: Adds a deep sweetness and a hint of molasses flavor, enhancing the overall taste of the filling.
- Cinnamon: A warm spice that brings a cozy aroma, making your kitchen smell like fall.
- Nutmeg: Just a pinch adds a nutty, slightly sweet flavor that complements the pumpkin beautifully.
- Ginger: This spice adds a zesty kick, balancing the sweetness of the filling.
- Cloves: A little goes a long way! Cloves provide a warm, aromatic depth to the filling.
- Cornstarch: This thickener helps bind the filling, ensuring it doesn’t ooze out during baking.
- Pie crusts: You can use store-bought or homemade crusts. They create that flaky, buttery exterior we all love.
- Egg (for egg wash): This gives the pop tarts a beautiful golden color and a shiny finish.
- Powdered sugar: Essential for the sweet glaze that tops off these pop tarts, making them irresistible.
- Milk: Just a splash helps create a smooth glaze that drizzles perfectly over the pop tarts.
For those looking to get creative, consider adding chocolate chips or nuts to the filling for extra texture. You can find the exact measurements for each ingredient at the bottom of the article, ready for printing!
How to Make Pumpkin Pie Pop Tarts
Step 1: Preheat the Oven
Preheating your oven is crucial for achieving that perfect flaky crust. Set it to 375°F (190°C) and let it warm up while you prepare the filling. This ensures even baking and helps the pop tarts rise beautifully, giving you that golden-brown finish we all crave.
Step 2: Prepare the Pumpkin Filling
In a mixing bowl, combine the pumpkin puree, brown sugar, cinnamon, nutmeg, ginger, cloves, and cornstarch. Stir until everything is well blended. The aroma will be heavenly! The spices create a warm, inviting flavor that dances on your taste buds. Let the filling sit for a few minutes to allow the flavors to meld together, enhancing the overall taste of your Pumpkin Pie Pop Tarts.
Step 3: Roll Out the Pie Crusts
Take your pie crusts and roll them out on a lightly floured surface. Aim for about 1/8 inch thick. Use a sharp knife or a pizza cutter to slice them into rectangles. Each rectangle should be about 3×4 inches. Don’t worry if they’re not perfect; a little rustic charm adds character! Keep the edges neat to ensure a good seal when you assemble the pop tarts.
Step 4: Assemble the Pop Tarts
Place a spoonful of the pumpkin filling on one half of each rectangle. Be careful not to overfill, or they might burst during baking! Fold the other half over the filling and press the edges together. Use a fork to crimp the edges, sealing in all that deliciousness. This step is key to keeping the filling intact while baking, so take your time!
Step 5: Brush with Egg Wash
To give your pop tarts that beautiful golden color, brush the tops with an egg wash made from a beaten egg. This simple step adds a lovely shine and enhances the overall appearance, making them look as good as they taste!
Step 6: Bake to Perfection
Place your assembled pop tarts on a baking sheet lined with parchment paper. Bake them in the preheated oven for 20-25 minutes, or until they’re golden brown. Keep an eye on them; the aroma will be tempting! You’ll know they’re done when the edges are crisp and the tops are beautifully browned. Let them cool slightly before glazing.
Step 7: Prepare the Glaze
In a small bowl, mix the powdered sugar and milk until smooth. This glaze is the finishing touch that makes your Pumpkin Pie Pop Tarts irresistible. It adds sweetness and a lovely contrast to the spiced filling, making each bite a delightful experience.
Step 8: Drizzle and Serve
Once the pop tarts have cooled, drizzle the glaze over the tops. You can use a spoon or a piping bag for more control. Serve them warm or at room temperature, and watch your family’s faces light up with joy!
Tips for Success
- Let the pumpkin filling sit for a few hours for deeper flavor.
- Use a sharp knife for cutting the pie crusts to ensure clean edges.
- Don’t skip the egg wash; it makes a big difference in appearance.
- Experiment with spices to customize the filling to your taste.
- Store leftover pop tarts in an airtight container to keep them fresh.
Equipment Needed
- Baking sheet: A standard baking sheet works perfectly. If you don’t have one, a large oven-safe dish will do.
- Parchment paper: This helps prevent sticking. If you’re out, lightly greasing the baking sheet is a good alternative.
- Mixing bowl: Any bowl will work, but a medium-sized one is ideal for mixing the filling.
- Fork: Essential for crimping the edges. A spoon can also work in a pinch!
- Rolling pin: If you don’t have one, a wine bottle can serve as a great substitute.
Variations
- Chocolate Chip Pumpkin Pie Pop Tarts: Add a handful of chocolate chips to the pumpkin filling for a sweet twist that chocolate lovers will adore.
- Nuts for Crunch: Incorporate chopped pecans or walnuts into the filling for added texture and a nutty flavor that complements the spices.
- Gluten-Free Option: Use gluten-free pie crusts to make these pop tarts suitable for those with gluten sensitivities.
- Vegan Version: Substitute the egg wash with a plant-based milk wash and use a vegan pie crust to create a delicious vegan treat.
- Spiced Variations: Experiment with different spices like cardamom or allspice to create your unique flavor profile.
Serving Suggestions
- Pair your Pumpkin Pie Pop Tarts with a warm cup of spiced chai or apple cider for a cozy fall experience.
- Serve with a dollop of whipped cream or a scoop of vanilla ice cream for an indulgent dessert.
- For a festive touch, sprinkle some cinnamon on top of the glaze before serving.
- Arrange them on a decorative platter for a beautiful presentation at gatherings.
FAQs about Pumpkin Pie Pop Tarts
Can I make Pumpkin Pie Pop Tarts ahead of time?
Absolutely! You can prepare the filling and assemble the pop tarts a day in advance. Just store them in the fridge until you’re ready to bake. This makes for a quick and easy treat when you need it!
How do I store leftover pop tarts?
Store your Pumpkin Pie Pop Tarts in an airtight container at room temperature for up to three days. If you want to keep them longer, consider freezing them. Just thaw and reheat before serving!
Can I use fresh pumpkin instead of canned?
Yes, fresh pumpkin works wonderfully! Just make sure to cook and puree it until smooth. This can add a lovely homemade touch to your Pumpkin Pie Pop Tarts.
What can I substitute for the egg wash?
If you’re looking for an egg-free option, you can brush the tops with milk or a plant-based milk. This will still give your pop tarts a nice shine!
Are these pop tarts suitable for kids?
Definitely! Kids love the sweet, spiced filling and flaky crust. Plus, they can help with the assembly, making it a fun family activity!
Final Thoughts
Making these Pumpkin Pie Pop Tarts is more than just baking; it’s about creating memories. The joy of pulling a tray of golden-brown pastries from the oven fills the kitchen with warmth and happiness. Each bite is a delightful reminder of cozy fall days spent with loved ones. Whether you enjoy them for breakfast or as a sweet treat, these pop tarts are sure to bring smiles to your family’s faces. So, roll up your sleeves, embrace the season, and let the aroma of spiced pumpkin fill your home. Trust me, you’ll be glad you did!