
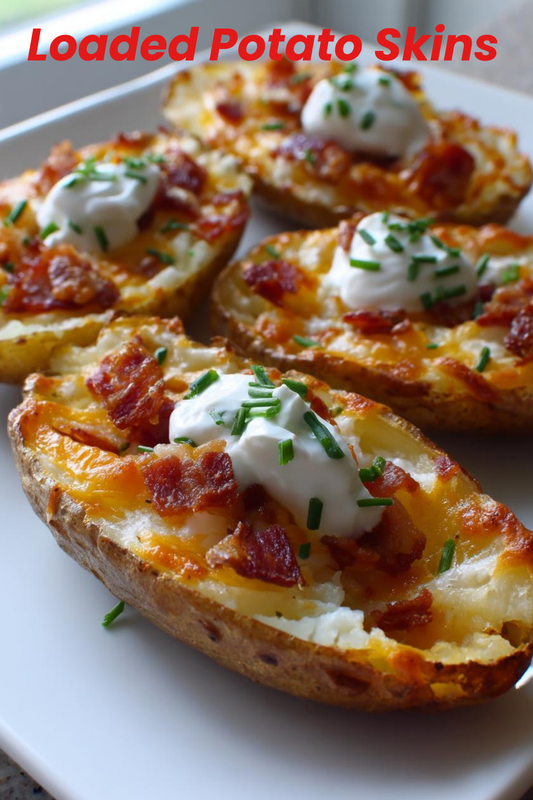
As a busy mom, I know how precious time can be, especially when it comes to meal prep. That’s why I absolutely adore Loaded Potato Skins! They’re not just a delicious appetizer; they’re a quick solution for a hectic day. Imagine crispy potato halves, filled to the brim with gooey cheese, savory bacon, and fresh green onions. It’s a dish that can impress your loved ones without keeping you in the kitchen for hours. Plus, they’re perfect for game nights or casual gatherings. Trust me, once you try this recipe, it’ll become a family favorite!
Why You’ll Love This Loaded Potato Skins
Loaded Potato Skins are the ultimate crowd-pleaser! They’re incredibly easy to make, which is a lifesaver for busy moms like me. In just over an hour, you can whip up a dish that’s bursting with flavor. The combination of crispy potatoes, melted cheese, and crispy bacon is simply irresistible. Plus, they’re versatile enough to customize with your favorite toppings, making them perfect for any occasion!
Ingredients for Loaded Potato Skins
Gathering the right ingredients is key to making the best Loaded Potato Skins. Here’s what you’ll need:
- Russet Potatoes: These starchy potatoes are perfect for baking. Their thick skin holds up well when scooped and filled.
- Shredded Cheddar Cheese: The star of the show! It melts beautifully and adds that rich, cheesy flavor we all crave.
- Cooked and Crumbled Bacon: For that smoky, savory touch. If you’re a vegetarian, feel free to skip this or substitute with crispy tempeh.
- Sour Cream: A creamy dip that balances the richness of the cheese and bacon. You can also use Greek yogurt for a healthier twist.
- Chopped Green Onions: These add a fresh crunch and a pop of color. They’re a great way to brighten up the dish.
- Olive Oil: This helps to crisp up the potato skins and adds flavor. You can use melted butter if you prefer.
- Salt and Pepper: Essential for seasoning. Don’t skip these; they enhance all the flavors!
Feel free to get creative! You can add jalapeños for a spicy kick or avocado for a creamy texture. The exact quantities for each ingredient are listed at the bottom of the article, ready for you to print out and take to the kitchen!
How to Make Loaded Potato Skins
Making Loaded Potato Skins is a delightful adventure! Follow these simple steps, and you’ll have a mouthwatering appetizer that everyone will love. Let’s dive in!
Step 1: Preheat the Oven
First things first, preheat your oven to 400°F (200°C). Preheating is crucial because it ensures even cooking. You want those potatoes to bake perfectly, so don’t skip this step!
Step 2: Prepare the Potatoes
Next, wash and scrub the russet potatoes under running water. This removes any dirt. Then, pierce each potato several times with a fork. This allows steam to escape while baking, preventing any potato explosions!
Step 3: Season the Potatoes
Now, rub the potatoes with olive oil, salt, and pepper. The olive oil helps crisp up the skins, while salt and pepper enhance the flavor. Trust me, this simple seasoning makes a world of difference!
Step 4: Bake the Potatoes
Place the potatoes directly on the oven rack and bake for 45-60 minutes. You’ll know they’re done when a fork easily pierces through the skin. The insides should be soft and fluffy, ready for scooping!
Step 5: Scoop and Fill
Once the potatoes have cooled slightly, cut them in half lengthwise. Carefully scoop out some of the flesh, leaving a bit of potato for structure. Now, fill each skin with shredded cheddar cheese, crumbled bacon, and chopped green onions. Get creative with your toppings!
Step 6: Final Bake
Return the filled potato skins to the oven for another 10-15 minutes. This second bake is essential for melting the cheese and allowing all those flavors to meld together. You want that cheese to be bubbly and golden!
Step 7: Serve and Enjoy
Finally, serve your Loaded Potato Skins hot, with a dollop of sour cream on the side. You can also sprinkle extra green onions on top for a pop of color. These little bites of heaven are perfect for sharing, or you might just want to keep them all to yourself!
Tips for Success
- Choose large russet potatoes for the best texture and flavor.
- Don’t rush the baking time; undercooked potatoes won’t scoop well.
- Experiment with toppings like jalapeños or olives for a twist.
- Make extra; they’re great for leftovers or snacks!
- Let the potatoes cool slightly before scooping to avoid burns.
Equipment Needed
- Baking Sheet: A sturdy sheet for holding your potato skins. A cast-iron skillet works too!
- Fork: Essential for piercing the potatoes. A sharp knife can also do the trick.
- Spoon: For scooping out the potato flesh. A melon baller is a fun alternative!
- Oven Mitts: Protect your hands when handling hot potatoes.
Variations
- Vegetarian Delight: Omit the bacon and load up on extra veggies like bell peppers, mushrooms, or spinach.
- Spicy Kick: Add sliced jalapeños or a drizzle of hot sauce for a fiery twist.
- BBQ Flavor: Swap out the bacon for pulled pork and drizzle with your favorite barbecue sauce.
- Cheesy Broccoli: Mix in steamed broccoli with the cheese for a nutritious boost.
- Southwestern Style: Top with black beans, corn, and a sprinkle of taco seasoning for a zesty flavor.
Serving Suggestions
- Pair your Loaded Potato Skins with a crisp green salad for a refreshing contrast.
- Serve alongside a zesty salsa or guacamole for added flavor.
- Complement with a chilled beer or a fruity mocktail for a fun twist.
- Present on a colorful platter to make them visually appealing!
FAQs about Loaded Potato Skins
Loaded Potato Skins are a popular appetizer, and I often get questions about them. Here are some common queries and their answers to help you out!
Can I make Loaded Potato Skins ahead of time?
Absolutely! You can prepare the potato skins in advance and store them in the fridge. Just bake them before serving for that fresh, crispy texture.
What can I substitute for bacon in Loaded Potato Skins?
If you want a vegetarian option, try using crispy tempeh or mushrooms. They add a nice umami flavor without the meat!
How do I store leftovers?
Store any leftover Loaded Potato Skins in an airtight container in the fridge. They’ll stay fresh for up to three days. Reheat them in the oven for the best results!
Can I freeze Loaded Potato Skins?
Yes, you can freeze them! Just make sure they’re fully cooled before placing them in a freezer-safe container. They can last up to three months in the freezer.
What are some creative toppings for Loaded Potato Skins?
The sky’s the limit! Try adding guacamole, diced tomatoes, or even a drizzle of ranch dressing. Get creative and make them your own!
Final Thoughts
Making Loaded Potato Skins is more than just cooking; it’s about creating moments. The joy of pulling those crispy, cheesy bites from the oven fills the kitchen with warmth and excitement. Whether it’s a family gathering or a cozy night in, these potato skins bring everyone together. They’re a canvas for creativity, allowing you to experiment with flavors and toppings. Plus, they’re a fantastic way to get the kids involved in the kitchen! So, roll up your sleeves, gather your loved ones, and enjoy the deliciousness of Loaded Potato Skins. Trust me, they’ll become a cherished tradition!
Print
Loaded Potato Skins: Discover the Ultimate Recipe here!
- Total Time: 1 hour 15 minutes
- Yield: 8 servings
- Diet: Gluten Free
Description
Loaded Potato Skins are a delicious appetizer made from crispy potato halves filled with cheese, bacon, and green onions.
Ingredients
- 4 large russet potatoes
- 1 cup shredded cheddar cheese
- 1/2 cup cooked and crumbled bacon
- 1/4 cup sour cream
- 1/4 cup chopped green onions
- 2 tablespoons olive oil
- Salt and pepper to taste
Instructions
- Preheat the oven to 400°F (200°C).
- Wash and scrub the potatoes, then pierce them with a fork.
- Rub the potatoes with olive oil, salt, and pepper.
- Bake the potatoes for 45-60 minutes until tender.
- Let the potatoes cool slightly, then cut them in half and scoop out some of the flesh.
- Fill each potato skin with cheese, bacon, and green onions.
- Return the filled potato skins to the oven and bake for an additional 10-15 minutes until the cheese is melted and bubbly.
- Serve with sour cream on the side.
Notes
- For a vegetarian option, omit the bacon.
- Feel free to add other toppings like jalapeños or avocado.
- These can be made ahead of time and reheated before serving.
- Prep Time: 15 minutes
- Cook Time: 1 hour
- Category: Appetizer
- Method: Baking
- Cuisine: American