
Introduction to Lemon Bar Recipe
Welcome to my kitchen, where I’m excited to share my favorite Lemon Bar Recipe! If you’re like me, juggling a busy life, you know how precious quick and delightful desserts can be. These lemon bars are not just a treat; they’re a burst of sunshine on a plate. Perfect for family gatherings or a simple afternoon snack, they’re easy to whip up and sure to impress. With just a handful of ingredients, you can create a tangy, sweet delight that will have everyone asking for seconds. Let’s dive into this zesty adventure together!
Print
Lemon Bar Recipe: Discover the Secret to Perfection!
- Total Time: 55 minutes
- Yield: 16 bars
- Diet: Vegetarian
Description
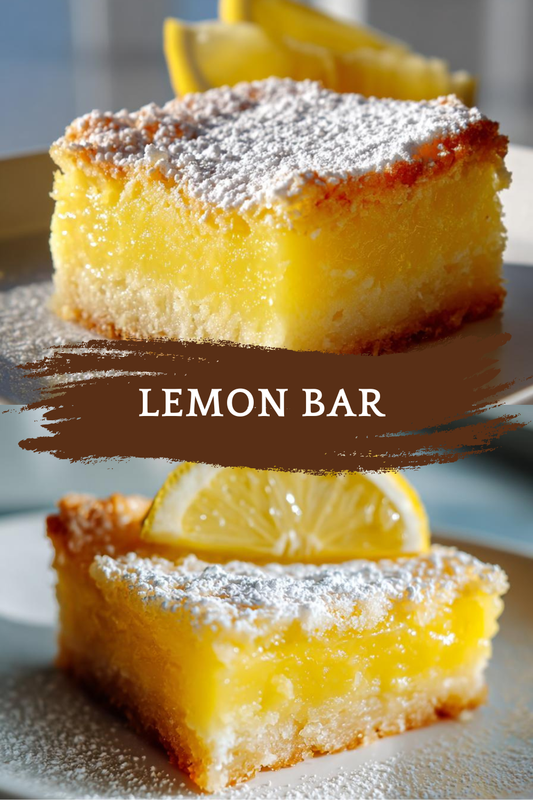
A delightful and tangy lemon bar recipe that is easy to make and perfect for any occasion.
Ingredients
- 1 cup all-purpose flour
- 1/2 cup powdered sugar
- 1/2 cup unsalted butter, softened
- 2 large eggs
- 1 cup granulated sugar
- 1/4 cup fresh lemon juice
- 1 tablespoon lemon zest
- 1/2 teaspoon baking powder
- 1/4 teaspoon salt
Instructions
- Preheat the oven to 350°F (175°C).
- In a mixing bowl, combine flour and powdered sugar, then cut in the butter until crumbly.
- Press the mixture into the bottom of a greased 8×8 inch baking dish.
- Bake for 15 minutes or until lightly golden.
- In another bowl, whisk together eggs, granulated sugar, lemon juice, lemon zest, baking powder, and salt.
- Pour the lemon mixture over the baked crust.
- Bake for an additional 20-25 minutes until set.
- Allow to cool before slicing into bars and dusting with powdered sugar.
Notes
- For a stronger lemon flavor, add more lemon zest.
- These bars can be stored in the refrigerator for up to a week.
- Serve chilled for a refreshing treat.
- Prep Time: 15 minutes
- Cook Time: 40 minutes
- Category: Dessert
- Method: Baking
- Cuisine: American
Why You’ll Love This Lemon Bar Recipe
This Lemon Bar Recipe is a lifesaver for busy moms and professionals alike. It’s quick to prepare, taking just 15 minutes of your time, and the results are simply divine. The balance of sweet and tangy flavors will dance on your taste buds, making it a crowd-pleaser. Plus, these bars are perfect for any occasion, whether it’s a family dinner or a potluck. You’ll love how easy it is to impress your loved ones!
Ingredients for Lemon Bar Recipe
Gathering the right ingredients is the first step to creating your perfect lemon bars. Here’s what you’ll need:
- All-purpose flour: This forms the base of your crust, giving it that delightful texture.
- Powdered sugar: Adds sweetness to the crust and helps it stay tender.
- Unsalted butter: Softened butter brings richness and flavor to the crust.
- Large eggs: They provide structure and help bind the filling together.
- Granulated sugar: Sweetens the lemon filling, balancing the tartness.
- Fresh lemon juice: The star of the show! It gives that zesty flavor we all love.
- Lemon zest: Adds an extra punch of lemony goodness, enhancing the aroma.
- Baking powder: A little leavening agent to help the filling rise slightly.
- Salt: Just a pinch to elevate all the flavors.
For those who want to experiment, consider adding more lemon zest for a stronger flavor or even a dash of vanilla extract for a unique twist. You can find all the exact measurements at the bottom of the article, ready for printing. Happy baking!
How to Make Lemon Bar Recipe
Step 1: Preheat the Oven
First things first, let’s get that oven preheating to 350°F (175°C). Preheating is crucial because it ensures even baking. If you skip this step, your lemon bars might not set properly. Trust me, you want that perfect texture!
Step 2: Prepare the Crust
In a mixing bowl, combine the all-purpose flour and powdered sugar. This mixture will create a sweet, tender crust. Next, cut in the softened butter using a pastry cutter or your fingers. You want it to resemble coarse crumbs. This technique helps the butter blend in, creating a flaky texture that melts in your mouth.
Step 3: Bake the Crust
Now, press the crust mixture firmly into the bottom of a greased 8×8 inch baking dish. Make sure it’s even! Bake it for about 15 minutes, or until it’s lightly golden. Keep an eye on it; you want it just right, not too dark!
Step 4: Make the Lemon Filling
While the crust is baking, let’s whip up that zesty filling! In another bowl, whisk together the eggs, granulated sugar, fresh lemon juice, lemon zest, baking powder, and salt. Whisk until it’s smooth and well combined. The aroma of fresh lemon will make your kitchen smell heavenly!
Step 5: Combine and Bake Again
Once the crust is ready, pour the lemon filling over it. Spread it evenly to ensure every bite is packed with flavor. Bake for an additional 20-25 minutes. You’ll know it’s done when the filling is set and slightly firm to the touch. A little jiggle is okay, but it shouldn’t be liquidy!
Step 6: Cool and Serve
After baking, let your lemon bars cool in the dish. This step is important for the filling to firm up. Once cooled, slice them into bars and dust with powdered sugar for that beautiful finish. Serve them chilled for a refreshing treat that’s sure to impress!
Tips for Success
- Use fresh lemons for the best flavor; bottled juice just doesn’t compare.
- Let the bars cool completely before slicing to avoid a messy cut.
- For a fun twist, try adding a sprinkle of sea salt on top before serving.
- Store leftovers in the fridge for a refreshing treat throughout the week.
- Experiment with different citrus fruits for unique flavor variations!
Equipment Needed
- Mixing bowls: Use any size you have; just make sure they’re sturdy.
- Whisk: A fork works in a pinch if you don’t have one.
- Pastry cutter: Your fingers can do the job if you’re in a hurry.
- Baking dish: An 8×8 inch pan is ideal, but any similar size will work.
- Measuring cups and spoons: Essential for accuracy; use a kitchen scale if you prefer!
Variations of Lemon Bar Recipe
- Gluten-Free: Substitute all-purpose flour with a gluten-free blend for a delicious gluten-free option.
- Berry Lemon Bars: Add fresh raspberries or blueberries to the lemon filling for a fruity twist.
- Coconut Lemon Bars: Mix in shredded coconut to the crust for a tropical flavor.
- Vegan Lemon Bars: Replace eggs with flaxseed meal mixed with water and use coconut oil instead of butter.
- Herbed Lemon Bars: Add a hint of fresh basil or mint to the filling for an unexpected flavor profile.
Serving Suggestions for Lemon Bar Recipe
- Pair with a dollop of whipped cream for a creamy contrast.
- Serve alongside fresh berries for a pop of color and flavor.
- Enjoy with a cup of herbal tea for a relaxing afternoon treat.
- Garnish with mint leaves for an elegant touch.
- Dust with powdered sugar right before serving for a beautiful finish.
FAQs about Lemon Bar Recipe
Can I use bottled lemon juice instead of fresh?
While bottled lemon juice is convenient, I highly recommend using fresh lemon juice for the best flavor. The vibrant taste of fresh lemons truly elevates this Lemon Bar Recipe!
How do I store leftover lemon bars?
Store your lemon bars in an airtight container in the refrigerator. They’ll stay fresh for up to a week, making them a perfect grab-and-go treat for busy days!
Can I freeze lemon bars?
Absolutely! Lemon bars freeze well. Just wrap them tightly in plastic wrap and place them in a freezer-safe container. They can last up to three months in the freezer.
What can I do if my lemon bars are too tart?
If you find your lemon bars too tart, you can balance the flavor by adding a bit more powdered sugar to the filling next time. A sprinkle of powdered sugar on top also helps sweeten each bite!
Can I make these lemon bars ahead of time?
Yes! These lemon bars can be made a day in advance. Just let them cool completely, then cover and refrigerate. They’ll be even more flavorful the next day!
Final Thoughts
Making this Lemon Bar Recipe is more than just baking; it’s about creating sweet memories in the kitchen. The joy of watching your loved ones savor each tangy bite is truly priceless. Whether it’s a sunny afternoon or a cozy family gathering, these lemon bars bring a burst of happiness to any occasion. Plus, the simplicity of the recipe means you can whip them up even on the busiest days. So, roll up your sleeves, embrace the zesty adventure, and let these delightful bars brighten your day. Trust me, you’ll be glad you did!