
Introduction to Halloween Mummy Fudge
As the leaves turn and the air gets crisp, I find myself dreaming of Halloween treats. One of my absolute favorites is Halloween Mummy Fudge. This delightful dessert is not just a feast for the eyes; it’s a quick solution for busy days filled with school events and family gatherings. With its creamy texture and spooky charm, it’s sure to impress your loved ones. Plus, it’s a fun way to get the kids involved in the kitchen! Let’s dive into this festive recipe that will make your Halloween celebrations even sweeter.
Print
Halloween Mummy Fudge: A Spooktacular Treat Awaits!
- Total Time: 2 hours 25 minutes
- Yield: 16 pieces
- Diet: Vegetarian
Description
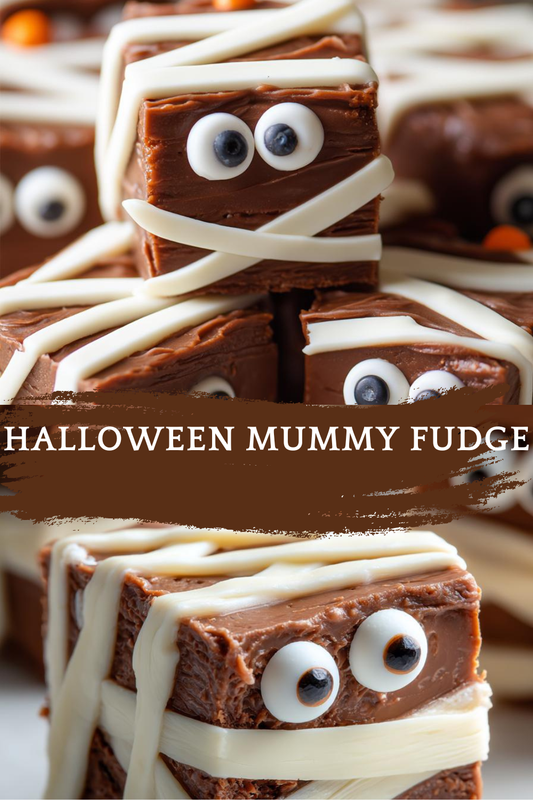
Halloween Mummy Fudge is a fun and festive treat perfect for Halloween celebrations, featuring a creamy fudge base decorated to resemble mummies.
Ingredients
- 2 cups white chocolate chips
- 1 can (14 oz) sweetened condensed milk
- 1 tsp vanilla extract
- 1/2 cup mini marshmallows
- 1/4 cup chocolate chips (for eyes)
- 1/4 cup black icing (for decoration)
Instructions
- In a saucepan, combine white chocolate chips and sweetened condensed milk over low heat, stirring until melted and smooth.
- Remove from heat and stir in vanilla extract.
- Pour the mixture into a greased 8×8 inch pan and spread evenly.
- Allow the fudge to cool at room temperature for about 2 hours or until set.
- Once set, cut the fudge into rectangles to resemble mummies.
- Use black icing to create eyes on each piece and add mini marshmallows for a spooky effect.
Notes
- Store fudge in an airtight container at room temperature for up to a week.
- For a more festive look, you can add edible googly eyes instead of chocolate chips.
- Feel free to experiment with different flavors of fudge as a base.
- Prep Time: 15 minutes
- Cook Time: 10 minutes
- Category: Dessert
- Method: Stovetop
- Cuisine: American
Why You’ll Love This Halloween Mummy Fudge
This Halloween Mummy Fudge is a game-changer for busy moms like us! It’s incredibly easy to whip up, taking just 15 minutes of prep time. The creamy, sweet flavor is a hit with both kids and adults, making it a perfect treat for any gathering. Plus, the festive mummy design adds a fun twist that will have everyone smiling. Trust me, this treat will become a Halloween staple in your home!
Ingredients for Halloween Mummy Fudge
Gathering the right ingredients is half the fun of making Halloween Mummy Fudge! Here’s what you’ll need:
- White chocolate chips: These are the star of the show, providing a creamy base that melts beautifully.
- Sweetened condensed milk: This adds richness and sweetness, making the fudge irresistibly smooth.
- Vanilla extract: A splash of this enhances the flavor, giving your fudge a warm, inviting aroma.
- Mini marshmallows: These little puffs add a fun texture and a touch of whimsy to your mummies.
- Chocolate chips: Perfect for creating those adorable eyes that bring your mummies to life!
- Black icing: This is your decorating tool, allowing you to add spooky details to your fudge.
Feel free to get creative! You can swap out the white chocolate for dark chocolate if you prefer a richer flavor. And if you can’t find mini marshmallows, regular ones can be cut down to size. For those who want to make it even more festive, consider using edible googly eyes instead of chocolate chips. The exact quantities for each ingredient are listed at the bottom of the article for easy printing!
How to Make Halloween Mummy Fudge
Making Halloween Mummy Fudge is a delightful adventure that even the busiest of us can tackle. Follow these simple steps, and you’ll have a spooky treat ready in no time!
Step 1: Melt the Chocolate
Start by combining the white chocolate chips and sweetened condensed milk in a saucepan. Set the heat to low and stir gently. You want to melt the chocolate slowly, creating a smooth, creamy mixture. This is where the magic begins!
Step 2: Add Flavor
Once your chocolate is melted and silky, remove the saucepan from the heat. Stir in the vanilla extract, which adds a lovely aroma and depth of flavor. Trust me, this step makes all the difference!
Step 3: Prepare the Pan
Next, grab an 8×8 inch pan and grease it lightly. Pour your melted fudge mixture into the pan, spreading it evenly with a spatula. This will ensure that every piece of fudge is perfectly shaped and ready for decoration.
Step 4: Cool the Fudge
Now comes the hardest part—waiting! Allow the fudge to cool at room temperature for about 2 hours or until it’s set. You can also pop it in the fridge if you’re in a hurry, but I find that patience pays off with the best texture.
Step 5: Cut into Mummies
Once your fudge is firm, it’s time to cut it into rectangles. Aim for pieces that resemble little mummies. Use a sharp knife for clean edges, and don’t worry if they’re not perfect; they’ll still look adorable!
Step 6: Decorate
Finally, it’s time to bring your mummies to life! Use black icing to create eyes on each piece. Then, add mini marshmallows for a fun, spooky effect. Your Halloween Mummy Fudge is now ready to impress!
Tips for Success
- Make sure to stir continuously while melting the chocolate to prevent burning.
- Use a non-stick pan for easy removal of the fudge.
- Let the fudge cool completely before cutting for cleaner edges.
- Experiment with different toppings like sprinkles or nuts for added texture.
- Store any leftovers in an airtight container to keep them fresh.
Equipment Needed
- Medium saucepan: A non-stick option works best for easy melting.
- Spatula: Use a silicone spatula for smooth mixing and scraping.
- 8×8 inch pan: If you don’t have one, a similar-sized dish will do.
- Sharp knife: Essential for cutting the fudge into mummy shapes.
- Parchment paper: Optional, but lining the pan makes for easy removal.
Variations of Halloween Mummy Fudge
- Dark Chocolate Mummy Fudge: Swap white chocolate for dark chocolate for a richer flavor that chocolate lovers will adore.
- Nutty Mummy Fudge: Add chopped nuts like walnuts or pecans for a delightful crunch that contrasts with the creamy fudge.
- Peanut Butter Mummy Fudge: Mix in some creamy peanut butter for a nutty twist that pairs perfectly with the sweetness.
- Vegan Mummy Fudge: Use dairy-free chocolate chips and coconut milk instead of sweetened condensed milk for a vegan-friendly treat.
- Gluten-Free Mummy Fudge: This recipe is naturally gluten-free, but always check your chocolate chips to ensure they meet your dietary needs.
Serving Suggestions for Halloween Mummy Fudge
- Pair with a warm cup of apple cider for a cozy fall treat.
- Serve on a spooky-themed platter to enhance the Halloween vibe.
- Include a side of fresh fruit like strawberries or oranges for a refreshing contrast.
- Wrap individual pieces in colorful cellophane for fun party favors.
- Garnish with edible glitter for an extra festive touch!
FAQs about Halloween Mummy Fudge
Can I make Halloween Mummy Fudge ahead of time?
Absolutely! This fudge can be made a few days in advance. Just store it in an airtight container at room temperature. It will stay fresh and delicious, ready to impress your guests!
How do I store leftover Halloween Mummy Fudge?
To keep your fudge fresh, store it in an airtight container. It can last up to a week at room temperature. If you want to keep it longer, you can refrigerate it, but let it come to room temperature before serving for the best texture.
Can I use different toppings for my mummies?
Definitely! While mini marshmallows and black icing are traditional, feel free to get creative. Sprinkles, edible glitter, or even crushed candy canes can add a fun twist to your Halloween Mummy Fudge!
Is this recipe suitable for kids to help with?
Yes! Making Halloween Mummy Fudge is a fun activity for kids. They can help with mixing, pouring, and decorating. Just supervise them while melting the chocolate to ensure safety!
Can I customize the flavor of the fudge?
Absolutely! You can experiment with different flavors by adding extracts like almond or peppermint. You can also mix in ingredients like peanut butter or caramel for a unique twist on this Halloween treat!
Final Thoughts
Creating Halloween Mummy Fudge is more than just making a treat; it’s about sharing joy and laughter with family. The smiles on my kids’ faces as they help decorate the mummies are priceless. This recipe brings a sense of togetherness, turning a simple kitchen task into a cherished memory. Plus, the delightful taste of creamy fudge wrapped in spooky charm makes it a hit at any gathering. So, whether you’re hosting a Halloween party or just looking for a fun activity, this fudge is sure to add sweetness to your celebrations. Enjoy every bite and every moment!