
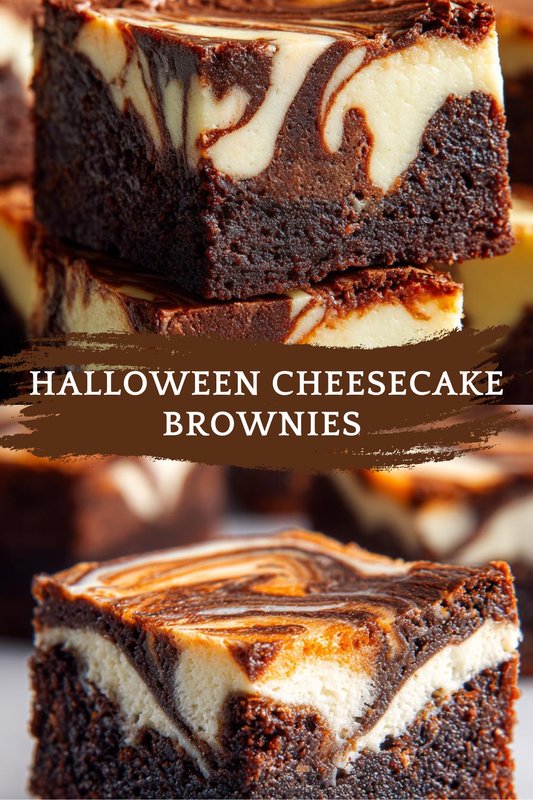
Introduction to Halloween Cheesecake Brownies
As the leaves turn and the air gets crisp, I find myself craving something sweet and festive. That’s where these Halloween Cheesecake Brownies come in! They’re not just a treat; they’re a delightful way to celebrate the spooky season with your loved ones. Perfect for busy moms like us, this recipe is quick and easy, making it a go-to for last-minute gatherings or school parties. Plus, who can resist the combination of rich chocolate brownies and creamy cheesecake? Trust me, these brownies will be the highlight of your Halloween festivities!
Print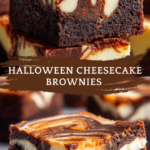
Halloween Cheesecake Brownies: A Spooky Treat You’ll Love!
- Total Time: 55 minutes
- Yield: 24 brownies
- Diet: Vegetarian
Description
Delicious Halloween-themed cheesecake brownies that are perfect for a spooky celebration.
Ingredients
- 1 cup unsalted butter
- 2 cups granulated sugar
- 4 large eggs
- 1 teaspoon vanilla extract
- 1 cup all-purpose flour
- 1 cup cocoa powder
- 1/2 teaspoon salt
- 8 oz cream cheese, softened
- 1/2 cup powdered sugar
- 1 egg
- 1 teaspoon vanilla extract
- Food coloring (orange and black)
Instructions
- Preheat the oven to 350°F (175°C) and grease a 9×13 inch baking pan.
- In a large bowl, melt the butter and mix in the granulated sugar.
- Add the eggs and vanilla extract, mixing until well combined.
- In another bowl, whisk together the flour, cocoa powder, and salt.
- Gradually add the dry ingredients to the wet mixture, stirring until just combined.
- In a separate bowl, beat the cream cheese until smooth, then add the powdered sugar, egg, and vanilla extract, mixing until creamy.
- Divide the brownie batter in half and color one half with orange food coloring and the other half with black food coloring.
- Pour the orange batter into the prepared pan, followed by dollops of the cream cheese mixture, and then top with the black batter.
- Use a knife to swirl the batters together for a marbled effect.
- Bake for 30-35 minutes or until a toothpick comes out clean.
- Let cool before cutting into squares and serving.
Notes
- For a more intense flavor, add chocolate chips to the brownie batter.
- Decorate with Halloween-themed sprinkles for an extra festive touch.
- Store leftovers in an airtight container in the refrigerator.
- Prep Time: 20 minutes
- Cook Time: 35 minutes
- Category: Dessert
- Method: Baking
- Cuisine: American
Why You’ll Love This Halloween Cheesecake Brownies
These Halloween Cheesecake Brownies are a dream come true for busy schedules. They come together in just over an hour, making them perfect for those last-minute treats. The rich, fudgy brownies paired with a creamy cheesecake layer create a flavor explosion that will have everyone asking for seconds. Plus, the vibrant colors make them a festive addition to any Halloween spread. You’ll love how easy they are to whip up!
Ingredients for Halloween Cheesecake Brownies
Gathering the right ingredients is half the fun! Here’s what you’ll need to create these delightful Halloween Cheesecake Brownies:
- Unsalted butter: This adds richness and moisture to the brownies. You can substitute with coconut oil for a dairy-free option.
- Granulated sugar: Sweetness is key! It balances the cocoa and enhances the overall flavor.
- Large eggs: They provide structure and help bind everything together. For a vegan twist, use flax eggs.
- Vanilla extract: A splash of vanilla elevates the flavor profile, making it more aromatic.
- All-purpose flour: This is the backbone of the brownies, giving them that perfect chewy texture.
- Cocoa powder: The star of the show! It gives the brownies their rich chocolate flavor. Use Dutch-processed cocoa for a deeper taste.
- Salt: Just a pinch enhances the sweetness and balances the flavors.
- Cream cheese: This is what makes the cheesecake layer so creamy and delicious. You can use low-fat cream cheese if you prefer.
- Powdered sugar: It sweetens the cream cheese layer without the graininess of granulated sugar.
- Food coloring (orange and black): These colors add a festive touch! Feel free to get creative with other colors for a unique twist.
For exact measurements, check the bottom of the article where you can find everything listed for easy printing. Happy baking!
How to Make Halloween Cheesecake Brownies
Now that you have your ingredients ready, let’s dive into the fun part—making these Halloween Cheesecake Brownies! Follow these simple steps, and you’ll have a spooky treat that’s sure to impress.
Step 1: Preheat and Prepare
First things first, preheat your oven to 350°F (175°C). This ensures your brownies bake evenly. While the oven warms up, grab a 9×13 inch baking pan and grease it well. You can use butter or cooking spray. This step is crucial to prevent sticking!
Step 2: Mix the Brownie Batter
In a large bowl, melt the unsalted butter. I usually do this in the microwave for about 30 seconds. Once melted, stir in the granulated sugar until it’s well combined. Next, add the eggs and vanilla extract. Mix everything together until it’s smooth and creamy. This is where the magic begins!
Step 3: Combine Dry Ingredients
In another bowl, whisk together the all-purpose flour, cocoa powder, and salt. This step helps to evenly distribute the cocoa and ensures there are no lumps. It’s like creating a little chocolate cloud of goodness!
Step 4: Blend the Mixtures
Now, gradually add the dry ingredients to the wet mixture. Stir gently until just combined. Be careful not to overmix; we want those brownies to stay fudgy and delicious!
Step 5: Prepare the Cream Cheese Layer
In a separate bowl, beat the softened cream cheese until it’s smooth. Then, mix in the powdered sugar, one egg, and a splash of vanilla extract. This creamy layer is what makes these brownies so special. It’s like a hidden treasure in every bite!
Step 6: Color the Batter
Divide the brownie batter in half. Color one half with orange food coloring and the other half with black. This is where you can get creative! Mix until the colors are vibrant and well blended. It’s like painting with chocolate!
Step 7: Layer the Batter
Pour the orange batter into the prepared pan, spreading it evenly. Next, add dollops of the cream cheese mixture on top. Finally, spoon the black batter over the cream cheese layer. Don’t worry about making it perfect; the swirling will do the trick!
Step 8: Swirl and Bake
Using a knife, gently swirl the batters together to create a marbled effect. This is where the fun really happens! Once you’re satisfied with the design, pop the pan into the oven and bake for 30-35 minutes. Keep an eye on them; a toothpick should come out clean when they’re done.
Step 9: Cool and Cut
After baking, let the brownies cool in the pan for about 10 minutes. Then, transfer them to a wire rack to cool completely. Once cooled, cut them into squares. You’ll be left with a spooky treat that’s as delicious as it is festive!
Tips for Success
- Make sure your ingredients are at room temperature for better mixing.
- Don’t overmix the brownie batter; it should be just combined for that fudgy texture.
- Use a toothpick to check for doneness; it should come out with a few moist crumbs.
- Let the brownies cool completely before cutting for cleaner edges.
- Experiment with different food coloring for a unique Halloween look!
Equipment Needed
- 9×13 inch baking pan: A standard size for brownies. You can use an 8×8 inch pan for thicker brownies.
- Mixing bowls: A couple of medium-sized bowls will do. You can also use a large pot if you’re in a pinch.
- Whisk and spatula: Essential for mixing. A fork can work in a hurry!
- Electric mixer: Great for the cream cheese layer, but a whisk will suffice if you’re feeling strong!
Variations
- Nutty Delight: Add chopped walnuts or pecans to the brownie batter for a crunchy texture.
- Minty Twist: Incorporate a few drops of peppermint extract into the cream cheese layer for a refreshing flavor.
- Gluten-Free Option: Substitute all-purpose flour with a gluten-free flour blend for a delicious gluten-free treat.
- Vegan Version: Use flax eggs and dairy-free cream cheese to make these brownies vegan-friendly.
- Spicy Kick: Add a pinch of cayenne pepper or cinnamon to the brownie batter for a surprising twist!
Serving Suggestions
- Pair these Halloween Cheesecake Brownies with a scoop of vanilla ice cream for a delightful contrast.
- Serve with a warm cup of spiced apple cider to enhance the fall flavors.
- For a festive touch, plate them on a spooky-themed platter with Halloween decorations.
- Drizzle with chocolate sauce or caramel for an extra indulgent treat.
FAQs about Halloween Cheesecake Brownies
Can I make these Halloween Cheesecake Brownies ahead of time?
Absolutely! You can bake them a day in advance. Just store them in an airtight container in the refrigerator. They’ll taste just as delicious the next day!
What can I use instead of cream cheese?
If you’re looking for a substitute, try using mascarpone cheese or a dairy-free cream cheese alternative. Both will give you that creamy texture without compromising flavor.
How do I store leftover brownies?
Store any leftovers in an airtight container at room temperature for up to three days. If you want to keep them longer, refrigerate them for up to a week.
Can I freeze these brownies?
Yes! These Halloween Cheesecake Brownies freeze beautifully. Just wrap them tightly in plastic wrap and place them in a freezer-safe container. They’ll last for up to three months.
What’s the best way to cut brownies for clean edges?
To achieve clean cuts, use a sharp knife and wipe it with a damp cloth between cuts. This helps prevent the brownies from sticking to the knife!
Final Thoughts
Making these Halloween Cheesecake Brownies is more than just baking; it’s about creating memories with your family. The joy of swirling vibrant colors and the aroma of chocolate wafting through your kitchen can brighten even the busiest of days. Each bite is a delightful mix of rich brownie and creamy cheesecake, perfect for sharing with friends or enjoying during a cozy family night. So, whether you’re hosting a spooky gathering or just treating yourself, these brownies are sure to bring smiles and a touch of magic to your Halloween celebrations. Happy baking!