
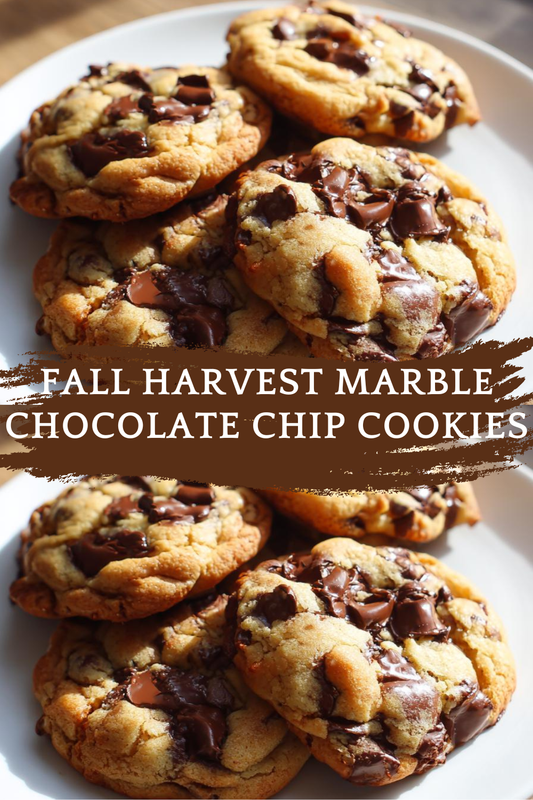
Introduction to Fall Harvest Marble Chocolate Chip Cookies
As the leaves turn and the air gets crisp, I find myself craving the cozy flavors of fall. That’s where my Fall Harvest Marble Chocolate Chip Cookies come in! These delightful treats are not just cookies; they’re a warm hug on a chilly day. Perfect for busy moms like us, they come together quickly and are sure to impress your loved ones. Whether you’re baking for a family gathering or just to enjoy with a cup of tea, these cookies are a delicious way to celebrate the season. Let’s dive into this scrumptious recipe!
Print
Fall Harvest Marble Chocolate Chip Cookies that Delight!
- Total Time: 27 minutes
- Yield: 24 cookies
- Diet: Vegetarian
Description
Delicious cookies that combine the flavors of fall with chocolate chips, perfect for the season.
Ingredients
- 1 cup unsalted butter, softened
- 1 cup brown sugar, packed
- 1/2 cup granulated sugar
- 2 large eggs
- 2 teaspoons vanilla extract
- 2 1/2 cups all-purpose flour
- 1 teaspoon baking soda
- 1/2 teaspoon salt
- 1 cup semi-sweet chocolate chips
- 1 cup white chocolate chips
- 1/2 cup pumpkin puree
- 1 teaspoon pumpkin spice
Instructions
- Preheat the oven to 350°F (175°C).
- In a large bowl, cream together the butter, brown sugar, and granulated sugar until smooth.
- Add the eggs and vanilla extract, mixing well.
- In another bowl, whisk together the flour, baking soda, and salt.
- Gradually add the dry ingredients to the wet ingredients, mixing until just combined.
- Fold in the chocolate chips, white chocolate chips, pumpkin puree, and pumpkin spice.
- Drop spoonfuls of dough onto a baking sheet lined with parchment paper.
- Bake for 10-12 minutes or until the edges are golden brown.
- Allow to cool on the baking sheet for a few minutes before transferring to a wire rack to cool completely.
Notes
- For a more intense pumpkin flavor, add an extra 1/4 cup of pumpkin puree.
- Store cookies in an airtight container for up to a week.
- These cookies can be frozen for up to 3 months.
- Prep Time: 15 minutes
- Cook Time: 12 minutes
- Category: Dessert
- Method: Baking
- Cuisine: American
Why You’ll Love This Fall Harvest Marble Chocolate Chip Cookies
These cookies are a delightful blend of flavors that capture the essence of autumn. They’re incredibly easy to whip up, making them perfect for busy days when time is tight. Plus, the combination of semi-sweet and white chocolate chips with pumpkin puree creates a taste sensation that’s hard to resist. You’ll love how they fill your home with a warm, inviting aroma, making every bite feel like a cozy celebration of fall!
Ingredients for Fall Harvest Marble Chocolate Chip Cookies
Gathering the right ingredients is the first step to creating these delightful cookies. Here’s what you’ll need:
- Unsalted butter: This adds richness and helps create a tender texture. Make sure it’s softened for easy mixing.
- Brown sugar: Packed brown sugar brings moisture and a hint of caramel flavor, enhancing the cookie’s depth.
- Granulated sugar: This sweetens the cookies and contributes to their lovely golden color.
- Large eggs: Eggs provide structure and moisture, making your cookies soft and chewy.
- Vanilla extract: A splash of vanilla adds warmth and enhances the overall flavor profile.
- All-purpose flour: The backbone of the cookie, it gives structure and helps achieve that perfect chewy texture.
- Baking soda: This leavening agent helps the cookies rise, creating a light and airy bite.
- Salt: Just a pinch balances the sweetness and enhances the flavors of the other ingredients.
- Semi-sweet chocolate chips: These classic chips provide a rich chocolatey flavor that pairs beautifully with the pumpkin.
- White chocolate chips: They add a creamy sweetness that contrasts nicely with the semi-sweet chocolate.
- Pumpkin puree: This is the star of the show! It adds moisture and a subtle pumpkin flavor that screams fall.
- Pumpkin spice: A blend of warm spices like cinnamon and nutmeg that brings the essence of autumn into every bite.
For those looking to experiment, consider adding an extra splash of vanilla or a sprinkle of nuts for added crunch. You can find all the exact measurements at the bottom of the article, ready for printing!
How to Make Fall Harvest Marble Chocolate Chip Cookies
Now that we have our ingredients ready, let’s get baking! Follow these simple steps to create your Fall Harvest Marble Chocolate Chip Cookies. Each step is designed to ensure your cookies turn out perfectly every time.
Step 1: Preheat the Oven
First things first, preheat your oven to 350°F (175°C). Preheating is crucial because it ensures that your cookies bake evenly. If the oven isn’t hot enough, your cookies might spread too much or not rise properly. Trust me, a well-preheated oven is the secret to cookie perfection!
Step 2: Cream the Butter and Sugars
In a large bowl, cream together the softened unsalted butter, brown sugar, and granulated sugar until smooth. This process is essential for creating a light and fluffy texture. The air you incorporate while creaming helps the cookies rise beautifully. Aim for a pale, creamy mixture that looks inviting!
Step 3: Add Eggs and Vanilla
Next, add the large eggs and vanilla extract to the creamed mixture. Mix well until everything is combined. The eggs provide moisture and structure, while the vanilla adds a warm, comforting flavor. It’s like a cozy hug for your taste buds!
Step 4: Combine Dry Ingredients
In another bowl, whisk together the all-purpose flour, baking soda, and salt. The flour is the backbone of your cookies, giving them structure. Baking soda acts as a leavening agent, helping them rise, while salt enhances the sweetness. This step ensures that your dry ingredients are evenly distributed.
Step 5: Mix Wet and Dry Ingredients
Gradually add the dry ingredients to the wet mixture, mixing until just combined. Be careful not to overmix! Overmixing can lead to tough cookies. You want a soft dough that’s slightly sticky but holds together nicely.
Step 6: Fold in Chocolate Chips and Pumpkin
Now comes the fun part! Gently fold in the semi-sweet chocolate chips, white chocolate chips, pumpkin puree, and pumpkin spice. This is where the magic happens. The chocolate chips add richness, while the pumpkin brings a delightful fall flavor. It’s a match made in cookie heaven!
Step 7: Scoop and Bake
Using a spoon or cookie scoop, drop spoonfuls of dough onto a baking sheet lined with parchment paper. Make sure to space them about two inches apart. This allows room for spreading. Bake for 10-12 minutes or until the edges are golden brown. Your kitchen will smell heavenly!
Step 8: Cool and Enjoy
Once baked, allow the cookies to cool on the baking sheet for a few minutes before transferring them to a wire rack. This cooling time is important; it helps the cookies set and enhances their chewy texture. Enjoy them warm, or store them in an airtight container for later. Either way, you’re in for a treat!
Tips for Success
- Use room temperature butter for easier creaming and a better texture.
- Don’t skip the preheating step; it’s key for even baking.
- For a chewier cookie, chill the dough for 30 minutes before baking.
- Experiment with different chocolate chips or nuts for added flavor.
- Keep an eye on the cookies; they can go from perfect to overbaked quickly!
Equipment Needed
- Mixing bowls: A large bowl for mixing and a smaller one for dry ingredients. You can use any size you have on hand.
- Electric mixer: A hand mixer works great, but a whisk and some elbow grease will do the trick!
- Baking sheet: A standard baking sheet lined with parchment paper ensures easy cleanup.
- Cookie scoop: This helps with portioning, but a spoon works just as well.
- Wire rack: For cooling cookies, but a plate can work in a pinch!
Variations
- Gluten-Free: Substitute all-purpose flour with a gluten-free blend for a delicious gluten-free option.
- Nutty Delight: Add 1/2 cup of chopped walnuts or pecans for a crunchy texture and nutty flavor.
- Spicy Kick: Incorporate a pinch of cayenne pepper or chili powder for a surprising twist on the classic flavor.
- Vegan Version: Replace eggs with flaxseed meal mixed with water and use vegan butter for a plant-based treat.
- Chocolate Lovers: Use all semi-sweet chocolate chips or add a swirl of chocolate ganache on top for extra indulgence.
Serving Suggestions
- Pair these cookies with a warm cup of spiced chai or pumpkin spice latte for a cozy treat.
- Serve alongside a scoop of vanilla ice cream for an indulgent dessert.
- For a festive touch, arrange cookies on a decorative platter with autumn leaves.
- Wrap cookies in cellophane and tie with a ribbon for a thoughtful gift.
FAQs about Fall Harvest Marble Chocolate Chip Cookies
Can I use fresh pumpkin instead of canned pumpkin puree?
Absolutely! If you have fresh pumpkin, just cook and puree it until smooth. It adds a lovely, fresh flavor to your Fall Harvest Marble Chocolate Chip Cookies.
How do I store these cookies to keep them fresh?
Store your cookies in an airtight container at room temperature for up to a week. If you want to keep them longer, freeze them for up to three months!
Can I make the dough ahead of time?
Yes! You can prepare the dough and refrigerate it for up to 24 hours. Just let it sit at room temperature for a few minutes before scooping and baking.
What can I substitute for pumpkin spice?
If you don’t have pumpkin spice, you can mix equal parts cinnamon, nutmeg, and ginger for a similar flavor profile in your cookies.
Are these cookies suitable for a gluten-free diet?
Yes! Simply swap the all-purpose flour with a gluten-free flour blend, and you’ll have delicious gluten-free Fall Harvest Marble Chocolate Chip Cookies!
Final Thoughts
Baking these Fall Harvest Marble Chocolate Chip Cookies is more than just a recipe; it’s a delightful experience that fills your home with warmth and joy. Each bite is a celebration of autumn, blending the rich flavors of chocolate and pumpkin in a way that feels both comforting and festive. Whether you’re sharing them with family or enjoying them solo with a cup of tea, these cookies bring a smile to your face. So, roll up your sleeves, embrace the season, and let the magic of baking create sweet memories in your kitchen!