
Introduction to Caramel Apple Board
As the leaves turn and the air gets crisp, I find myself craving the sweet, nostalgic flavors of fall. That’s where my caramel apple board comes in! It’s not just a dessert; it’s a delightful experience that brings family and friends together. Perfect for busy moms like us, this recipe is a quick solution for a fun gathering or a cozy night in. Imagine the smiles on your loved ones’ faces as they dive into a platter of caramel-coated apples, topped with their favorite goodies. Trust me, this is one treat you won’t want to miss!
Print
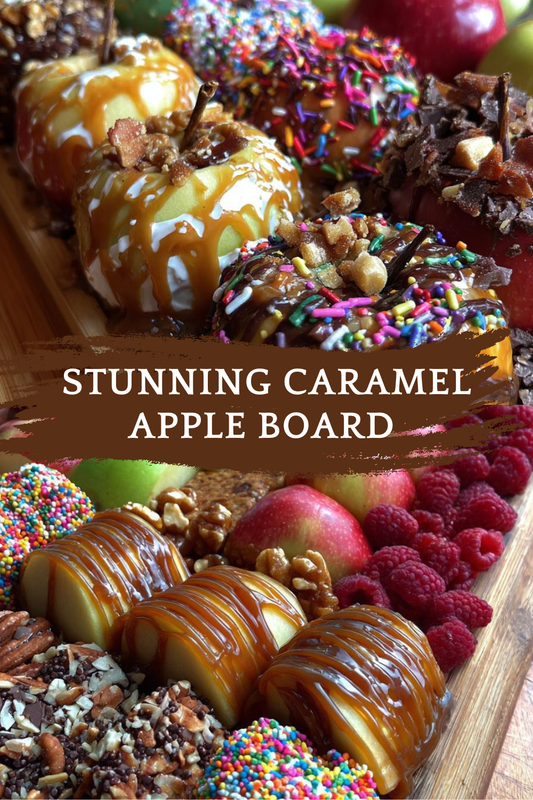
Caramel Apple Board: Discover Delicious Serving Ideas!
- Total Time: 20 minutes
- Yield: 4 servings
- Diet: Vegetarian
Description
A delightful and creative way to serve caramel apples with various toppings and accompaniments.
Ingredients
- 4 medium apples
- 1 cup caramel sauce
- 1/2 cup chopped nuts (e.g., peanuts, almonds)
- 1/2 cup mini chocolate chips
- 1/2 cup sprinkles
- 1/2 cup shredded coconut
- 1/2 cup crushed cookies (e.g., Oreos)
- Wooden sticks or skewers
Instructions
- Wash and dry the apples thoroughly.
- Insert wooden sticks into the top of each apple.
- In a microwave-safe bowl, heat the caramel sauce until melted.
- Dip each apple into the melted caramel, ensuring it is fully coated.
- Allow excess caramel to drip off, then roll the apple in your choice of toppings.
- Place the finished apples on a serving board or platter.
- Arrange additional toppings around the apples for guests to enjoy.
Notes
- For a healthier option, use dark chocolate or yogurt-covered toppings.
- Make sure the apples are firm for better dipping.
- Experiment with different toppings to suit your taste.
- Prep Time: 15 minutes
- Cook Time: 5 minutes
- Category: Dessert
- Method: No-bake
- Cuisine: American
Why You’ll Love This Caramel Apple Board
This caramel apple board is a game-changer for busy days! It’s incredibly easy to whip up, taking just 20 minutes from start to finish. The best part? You can customize it to suit everyone’s taste buds. Whether you prefer crunchy nuts or colorful sprinkles, there’s something for everyone. Plus, it’s a fun way to get the kids involved in the kitchen, making memories while creating a delicious treat together!
Ingredients for Caramel Apple Board
Creating a caramel apple board is all about using fresh, quality ingredients that bring joy to your taste buds. Here’s what you’ll need:
- Apples: Choose medium-sized apples like Granny Smith or Honeycrisp for a perfect balance of sweet and tart.
- Caramel Sauce: A rich, gooey caramel sauce is the star of the show. You can use store-bought or make your own for a personal touch.
- Chopped Nuts: Peanuts or almonds add a delightful crunch. Feel free to swap in your favorite nuts or even seeds for a nut-free option.
- Mini Chocolate Chips: These little morsels bring a sweet, melty goodness that pairs beautifully with caramel.
- Sprinkles: Colorful sprinkles are a fun way to add a festive touch. They’re perfect for kids and the young at heart!
- Shredded Coconut: For a tropical twist, shredded coconut adds a chewy texture and a hint of sweetness.
- Crushed Cookies: Think Oreos or graham crackers for a deliciously crunchy topping that adds a unique flavor.
- Wooden Sticks or Skewers: These are essential for dipping and enjoying your caramel apples without the mess.
For exact measurements, check the bottom of the article where you can find everything available for printing. Feel free to get creative with your toppings—this is your chance to experiment and make it your own!
How to Make Caramel Apple Board
Step 1: Prepare the Apples
Start by washing your apples thoroughly under cool running water. This step is crucial to remove any wax or residue. Once they’re clean, dry them completely with a soft towel. A dry surface helps the caramel stick better, ensuring a delicious coating.
Step 2: Insert Sticks
Next, take your wooden sticks or skewers and gently insert them into the top of each apple. Aim for the center, pushing about halfway in. This will give you a sturdy handle for dipping and enjoying your caramel apples without any mess!
Step 3: Melt the Caramel
Now, it’s time to melt the caramel sauce. Place it in a microwave-safe bowl and heat it in 30-second intervals, stirring in between. Keep an eye on it to avoid burning. You want it smooth and gooey, perfect for dipping!
Step 4: Dip the Apples
Once your caramel is melted, dip each apple into the warm caramel. Make sure to coat it fully, giving it a nice swirl. Let any excess caramel drip off back into the bowl. This step is where the magic happens, transforming your apples into a sweet treat!
Step 5: Add Toppings
After dipping, it’s time for the fun part—adding toppings! Roll the caramel-coated apple in your choice of toppings. Whether it’s crunchy nuts or colorful sprinkles, this is where you can get creative. Make sure to cover the apple well for maximum flavor!
Step 6: Arrange on Board
Now that your apples are beautifully decorated, place them on a serving board or platter. Arrange them in a way that’s visually appealing. This is your chance to show off your culinary creation and make it look inviting!
Step 7: Serve with Extra Toppings
Finally, don’t forget to arrange additional toppings around the apples on the board. This allows your guests to customize their treats even further. It’s a fun way to encourage everyone to dive in and enjoy the deliciousness!
Tips for Success
- Choose firm apples for better caramel adherence and crunch.
- Work quickly after melting the caramel to prevent it from hardening.
- Use a variety of toppings to cater to different tastes.
- Consider using parchment paper under the apples for easy cleanup.
- Let the apples cool slightly before serving to avoid burns.
Equipment Needed
- Microwave-safe bowl: For melting caramel; a small saucepan works too.
- Wooden sticks or skewers: Essential for dipping; popsicle sticks are a great alternative.
- Serving board or platter: To display your caramel apple board; any large plate will do.
- Soft towel: For drying apples; paper towels can work in a pinch.
Variations of Caramel Apple Board
- Chocolate Drizzle: Drizzle melted dark or white chocolate over the caramel apples for an extra layer of sweetness.
- Nut-Free Option: Swap out nuts for seeds like pumpkin or sunflower for a crunchy, nut-free alternative.
- Spiced Caramel: Add a pinch of cinnamon or nutmeg to your caramel sauce for a warm, cozy flavor.
- Fruit Dippers: Include slices of bananas or pears alongside the apples for a fruity twist.
- Vegan Version: Use dairy-free caramel sauce and plant-based toppings to create a vegan-friendly treat.
Serving Suggestions for Caramel Apple Board
- Pair with warm apple cider for a cozy fall vibe.
- Serve alongside a scoop of vanilla ice cream for a delightful contrast.
- Present on a rustic wooden board for a charming touch.
- Include a small bowl of extra caramel for dipping.
- Offer napkins and plates for easy enjoyment!
FAQs about Caramel Apple Board
Can I make the caramel apple board ahead of time?
Absolutely! You can prepare the apples and toppings in advance. Just dip the apples in caramel and add toppings right before serving to keep everything fresh and delicious.
What types of apples work best for a caramel apple board?
I recommend using firm apples like Granny Smith or Honeycrisp. Their crisp texture holds up well against the caramel and toppings, making for a delightful crunch!
How do I store leftover caramel apples?
If you have any leftovers, store them in an airtight container in the fridge. They’re best enjoyed within a day or two, as the caramel can become sticky over time.
Can I customize the toppings for my caramel apple board?
Definitely! Feel free to get creative with your toppings. You can use anything from crushed candies to dried fruits. The sky’s the limit!
Is this caramel apple board suitable for kids?
Yes! This is a fun and interactive treat for kids. They’ll love dipping and decorating their own apples, making it a perfect family activity!
Final Thoughts
Creating a caramel apple board is more than just making a dessert; it’s about crafting memories with loved ones. The joy of dipping, decorating, and sharing these sweet treats brings everyone together, sparking laughter and conversation. I cherish the moments spent in the kitchen, watching my kids get creative with toppings. This recipe is a delightful way to celebrate the flavors of fall while keeping things simple and fun. So, gather your family, unleash your creativity, and enjoy the deliciousness of your caramel apple board. Trust me, it’s a treat that will leave everyone smiling!