

Hey there, fellow snack lovers! If you’re anything like me, you know that life can get pretty hectic. Between juggling work, family, and everything in between, finding time to whip up a treat can feel impossible. That’s where my beloved Butterfinger Puppy Chow comes in! This delightful snack is not only a quick solution for a busy day, but it also brings a smile to everyone’s face. With its sweet, crunchy goodness, it’s perfect for satisfying that sweet tooth or impressing your loved ones at your next gathering. Trust me, you’ll want to keep this recipe close!
Why You’ll Love This Butterfinger Puppy Chow
This Butterfinger Puppy Chow is a game-changer for busy moms and professionals alike. It’s incredibly easy to make, taking just 20 minutes from start to finish. Plus, it requires no baking, which means less mess and more time for you! The combination of chocolate, peanut butter, and Butterfinger candy bars creates a flavor explosion that’s hard to resist. Trust me, once you try it, you’ll be hooked!
Ingredients for Butterfinger Puppy Chow
Gathering the right ingredients is the first step to creating your delicious Butterfinger Puppy Chow. Here’s what you’ll need:
- Rice Chex cereal: This crunchy base adds texture and holds all the sweet goodness together.
- Creamy peanut butter: It brings a rich, nutty flavor that pairs perfectly with chocolate.
- Chocolate chips: Choose semi-sweet or milk chocolate for that melt-in-your-mouth experience.
- Butterfinger candy bars: These crushed bars add a delightful crunch and a burst of caramel flavor.
- Powdered sugar: This sweet coating gives your Puppy Chow that signature sweetness and helps it stick together.
Feel free to get creative! You can substitute the Butterfinger with other candy bars like Snickers or Reese’s for a different twist. If you’re looking for a nut-free option, try sunflower seed butter instead of peanut butter. The exact quantities for each ingredient are listed at the bottom of the article for your convenience.
How to Make Butterfinger Puppy Chow
Now that you have your ingredients ready, let’s dive into making this delightful Butterfinger Puppy Chow! Follow these simple steps, and you’ll have a sweet snack that’s sure to impress.
Step 1: Prepare the Cereal
Start by measuring out 4 cups of Rice Chex cereal. Pour it into a large mixing bowl and set it aside. This crunchy base is what makes your Puppy Chow so satisfying!
Step 2: Melt the Chocolate and Peanut Butter
In a microwave-safe bowl, combine 1 cup of chocolate chips and 1 cup of creamy peanut butter. Microwave the mixture in 30-second intervals. Stir in between until it’s melted and smooth. This step is crucial for that luscious coating!
Step 3: Combine the Mixture
Once your chocolate and peanut butter are melted, pour the mixture over the Rice Chex cereal. Gently stir until every piece is coated. Take your time here; you want that sweet goodness to cover every nook and cranny!
Step 4: Add the Butterfinger
Now, it’s time to add the magic! Toss in 1 cup of crushed Butterfinger candy bars. Stir gently to combine. The crunch from the Butterfinger adds a delightful texture that makes this treat irresistible.
Step 5: Coat with Powdered Sugar
Transfer your mixture into a large zip-top bag. Add 1 cup of powdered sugar, seal the bag, and shake it like you mean it! This will coat your Puppy Chow evenly, giving it that sweet finish we all love.
Step 6: Cool and Serve
Spread the coated mixture onto a baking sheet to cool. Let it sit for a bit before serving. This step helps the flavors meld together beautifully. Once cooled, it’s ready to be enjoyed!
Tips for Success
- Use a large bowl for mixing to avoid spills.
- Make sure your chocolate and peanut butter are fully melted for a smooth coating.
- Let the Puppy Chow cool completely before storing to maintain its crunch.
- For extra flavor, try adding a pinch of sea salt to the chocolate mixture.
- Keep it in an airtight container to stay fresh for up to a week.
Equipment Needed
- Large mixing bowl: A big bowl helps prevent spills. A pot can work in a pinch!
- Microwave-safe bowl: Essential for melting chocolate and peanut butter. Any heatproof bowl will do.
- Zip-top bag: Perfect for shaking with powdered sugar. A large container can also work.
- Baking sheet: For cooling your Puppy Chow. A plate can be a quick alternative.
Variations of Butterfinger Puppy Chow
- Nut-Free Version: Swap out the peanut butter for sunflower seed butter to make it safe for those with nut allergies.
- Dark Chocolate Delight: Use dark chocolate chips instead of milk chocolate for a richer flavor.
- Mix It Up: Try adding other crushed candy bars like Reese’s or Milky Way for a fun twist.
- Healthier Option: Substitute half of the Rice Chex with whole grain cereal for added fiber.
- Seasonal Flavors: Add a sprinkle of pumpkin spice or cinnamon for a festive touch during the holidays.
Serving Suggestions for Butterfinger Puppy Chow
- Pair it with a tall glass of cold milk for a classic combo.
- Serve in cute, colorful bowls for a fun presentation at parties.
- Sprinkle some extra crushed Butterfinger on top for added flair.
- Use it as a topping for ice cream for a decadent dessert.
- Package it in mason jars for a delightful homemade gift.
FAQs about Butterfinger Puppy Chow
Can I make Butterfinger Puppy Chow ahead of time?
Absolutely! This sweet treat can be made a day or two in advance. Just store it in an airtight container to keep it fresh. It’s perfect for parties or as a quick snack during the week!
What can I substitute for Rice Chex cereal?
If you don’t have Rice Chex on hand, you can use Corn Chex or even Crispix. Just make sure whatever you choose has a similar crunchy texture to hold up against the chocolate and peanut butter.
How long does Butterfinger Puppy Chow last?
When stored properly in an airtight container, your Butterfinger Puppy Chow will stay fresh for up to a week. But trust me, it’s so delicious, it might not last that long!
Can I use other candy bars instead of Butterfinger?
Definitely! Feel free to experiment with other candy bars like Snickers, Milky Way, or even M&M’s. Each will give your Puppy Chow a unique twist that’s sure to delight!
Is Butterfinger Puppy Chow gluten-free?
Yes, as long as you use gluten-free Rice Chex cereal, this treat can be enjoyed by those with gluten sensitivities. Just double-check the labels to be safe!
Final Thoughts
Making Butterfinger Puppy Chow is more than just whipping up a quick snack; it’s about creating joyful moments. Whether you’re sharing it with family during movie night or surprising your coworkers with a sweet treat, this recipe brings smiles all around. The delightful crunch, combined with the rich flavors of chocolate and Butterfinger, creates a nostalgic experience that’s hard to resist. Plus, it’s a no-bake wonder that fits perfectly into our busy lives. So, gather your ingredients, and let the sweet adventure begin. Trust me, you’ll be glad you did!
Print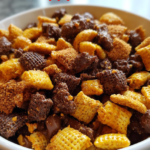
Butterfinger Puppy Chow: A Sweet Snack Surprise!
- Total Time: 20 minutes
- Yield: 8 servings
- Diet: Vegetarian
Description
Butterfinger Puppy Chow is a delightful and sweet snack made with cereal, chocolate, and Butterfinger candy bars, perfect for satisfying your sweet tooth.
Ingredients
- 4 cups Rice Chex cereal
- 1 cup creamy peanut butter
- 1 cup chocolate chips
- 1 cup Butterfinger candy bars, crushed
- 1 cup powdered sugar
Instructions
- In a large bowl, measure out the Rice Chex cereal and set aside.
- In a microwave-safe bowl, combine the chocolate chips and peanut butter. Microwave in 30-second intervals, stirring in between, until melted and smooth.
- Pour the melted chocolate mixture over the Rice Chex cereal and gently stir until all the cereal is coated.
- Add the crushed Butterfinger candy bars to the mixture and stir to combine.
- Transfer the mixture to a large zip-top bag, add the powdered sugar, and shake until evenly coated.
- Spread the coated mixture onto a baking sheet to cool before serving.
Notes
- Store in an airtight container for up to a week.
- Feel free to substitute with other candy bars if desired.
- For a crunchier texture, let it sit longer before serving.
- Prep Time: 15 minutes
- Cook Time: 5 minutes
- Category: Snack
- Method: No-Bake
- Cuisine: American