
As a busy mom, I know how challenging it can be to whip up something delicious and impressive in a pinch. That’s where the cheese ball comes in! This delightful appetizer is not only easy to make, but it also brings a smile to everyone’s face. Picture this: a creamy, flavorful cheese ball, perfect for gatherings or a cozy night in. It’s a quick solution for a busy day, and trust me, your loved ones will be raving about it. Let’s dive into this cheesy adventure together!
Why You’ll Love This Cheese Ball
This cheese ball is a game-changer for any gathering! It’s incredibly easy to whip up, taking just 15 minutes of your time. Plus, it requires no cooking, making it perfect for busy days. The combination of creamy cheese and crunchy nuts creates a delightful texture that everyone will love. Whether it’s a party or a family movie night, this cheese ball is sure to impress and satisfy your guests!
Ingredients for Cheese Ball
Creating a cheese ball is all about using simple, quality ingredients that come together to create a delightful appetizer. Here’s what you’ll need:
- Cream Cheese: The base of our cheese ball, it provides that creamy texture we all love.
- Shredded Cheddar Cheese: Adds a sharp, tangy flavor that pairs beautifully with the cream cheese.
- Chopped Green Onions: These bring a fresh, mild onion flavor that brightens up the dish.
- Chopped Nuts: Walnuts or pecans add a crunchy texture and nutty flavor. Feel free to use your favorite!
- Garlic Powder: A sprinkle of this gives the cheese ball a savory kick.
- Onion Powder: Enhances the overall flavor profile without overpowering the dish.
- Paprika: This adds a touch of color and a subtle smokiness.
- Black Pepper: A dash of this brings a bit of heat to balance the creaminess.
- Salt: Essential for enhancing all the flavors in the cheese ball.
Feel free to customize your cheese ball with herbs or spices you love! You can also swap out the nuts for seeds if you have nut allergies. For exact measurements, check the bottom of the article where you can find everything available for printing.
How to Make Cheese Ball
Step 1: Combine Ingredients
Start by gathering all your ingredients. In a mixing bowl, add the softened cream cheese, shredded cheddar cheese, and chopped green onions. This is where the magic begins! The combination of these ingredients sets the stage for a delicious cheese ball.
Step 2: Mix Until Smooth
Using a spatula or a hand mixer, blend everything together until it’s smooth and creamy. You want to ensure that all the flavors meld beautifully. Don’t rush this step; a well-mixed cheese ball is a happy cheese ball!
Step 3: Shape the Cheese Ball
Once your mixture is smooth, it’s time to get your hands a little cheesy! Shape the mixture into a ball. If you want a more rustic look, don’t worry about making it perfect. The charm of a cheese ball is in its homemade feel!
Step 4: Refrigerate
Wrap your cheese ball in plastic wrap and pop it in the fridge. Let it chill for at least two hours. This step is crucial as it helps the cheese ball firm up, making it easier to coat and serve later. Plus, the flavors will deepen while it chills!
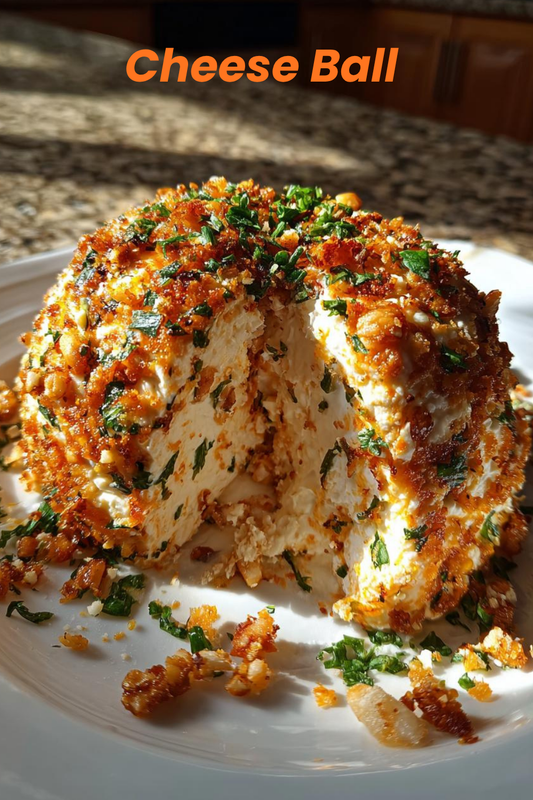
Step 5: Coat with Nuts
After your cheese ball has chilled, it’s time for the fun part! Unwrap it and roll it in the chopped nuts. This adds a delightful crunch and a beautiful presentation. Make sure to coat it evenly for that perfect look!
Step 6: Serve with Accompaniments
Finally, it’s time to serve your masterpiece! Place the cheese ball on a platter and surround it with crackers or fresh veggies. This not only looks inviting but also gives your guests plenty of options to enjoy. Get ready for the compliments to roll in!
Tips for Success
- Make sure your cream cheese is softened for easy mixing.
- Chill the cheese ball overnight for even better flavor.
- Experiment with different cheeses for unique tastes.
- Use fresh herbs for a burst of flavor.
- Don’t skip the nuts; they add a wonderful crunch!
Equipment Needed
- Mixing Bowl: A medium-sized bowl works best. You can also use a large plate if you’re in a pinch.
- Spatula or Hand Mixer: A spatula is great for mixing by hand, while a hand mixer speeds things up.
- Plastic Wrap: Essential for chilling your cheese ball. If you don’t have any, a reusable container will do!
- Serving Platter: Any large plate or board will showcase your cheese ball beautifully.
Variations
- Herb Cheese Ball: Add fresh herbs like dill, parsley, or chives for a burst of flavor.
- Spicy Cheese Ball: Mix in some diced jalapeños or a dash of hot sauce for a kick.
- Sweet Cheese Ball: Incorporate dried fruits like cranberries or apricots and roll in coconut for a sweet twist.
- Smoky Cheese Ball: Use smoked cheddar or add a bit of liquid smoke for a rich, smoky flavor.
- Vegan Cheese Ball: Substitute cream cheese with a plant-based alternative and use nutritional yeast for a cheesy flavor.
Serving Suggestions
- Pair your cheese ball with an assortment of crackers for a delightful crunch.
- Fresh veggies like carrots, celery, and bell peppers add a colorful touch.
- Serve with a selection of dips, like salsa or hummus, for variety.
- For drinks, consider a light white wine or sparkling water.
- Present on a wooden board for a rustic, inviting look.
FAQs about Cheese Ball
Can I make a cheese ball in advance?
Absolutely! In fact, making a cheese ball a day ahead is a great idea. It allows the flavors to meld beautifully. Just wrap it tightly in plastic wrap and store it in the fridge until you’re ready to serve.
What can I serve with a cheese ball?
Cheese balls pair wonderfully with an array of accompaniments. Crackers, fresh veggies, and even pretzel bites make excellent choices. You can also add some dips like salsa or hummus for extra flavor!
How long can I store leftovers?
If you have any leftovers, don’t worry! You can store your cheese ball in the refrigerator for up to a week. Just make sure it’s wrapped well to keep it fresh.
Can I customize the flavors in my cheese ball?
<pDefinitely! The beauty of a cheese ball lies in its versatility. Feel free to experiment with different herbs, spices, or even add-ins like bacon bits or sun-dried tomatoes to create your perfect flavor profile.
Is a cheese ball suitable for vegetarians?
<pYes, this cheese ball is vegetarian-friendly! Just ensure that any additional ingredients you choose, like crackers or dips, are also vegetarian. Enjoy your cheesy creation!
Final Thoughts
Making a cheese ball is more than just preparing an appetizer; it’s about creating moments of joy and connection. Whether it’s a family gathering or a casual get-together with friends, this delightful cheese ball brings everyone together. The smiles, laughter, and compliments that follow are the true rewards of your culinary efforts. Plus, with its easy preparation, you can focus on what really matters—enjoying time with your loved ones. So, roll up your sleeves, get cheesy, and let this cheese ball be the star of your next gathering!
Print
Cheese Ball: Discover Easy Recipes for Any Occasion!
- Total Time: 2 hours 15 minutes
- Yield: 8 servings
- Diet: Vegetarian
Description
A cheese ball is a delicious and versatile appetizer made from cream cheese and various flavorings, perfect for any gathering.
Ingredients
- 8 oz cream cheese, softened
- 1 cup shredded cheddar cheese
- 1/2 cup chopped green onions
- 1/2 cup chopped nuts (walnuts or pecans)
- 1 tsp garlic powder
- 1 tsp onion powder
- 1/2 tsp paprika
- 1/4 tsp black pepper
- 1/4 tsp salt
Instructions
- In a mixing bowl, combine the softened cream cheese, shredded cheddar cheese, green onions, garlic powder, onion powder, paprika, black pepper, and salt.
- Mix until well combined and smooth.
- Shape the mixture into a ball and wrap it in plastic wrap.
- Refrigerate for at least 2 hours to firm up.
- Before serving, roll the cheese ball in chopped nuts to coat the outside.
- Serve with crackers or fresh vegetables.
Notes
- Feel free to customize the cheese ball with your favorite herbs and spices.
- Can be made a day in advance for convenience.
- Store leftovers in the refrigerator for up to a week.
- Prep Time: 15 minutes
- Cook Time: 0 minutes
- Category: Appetizer
- Method: No-Cook
- Cuisine: American