
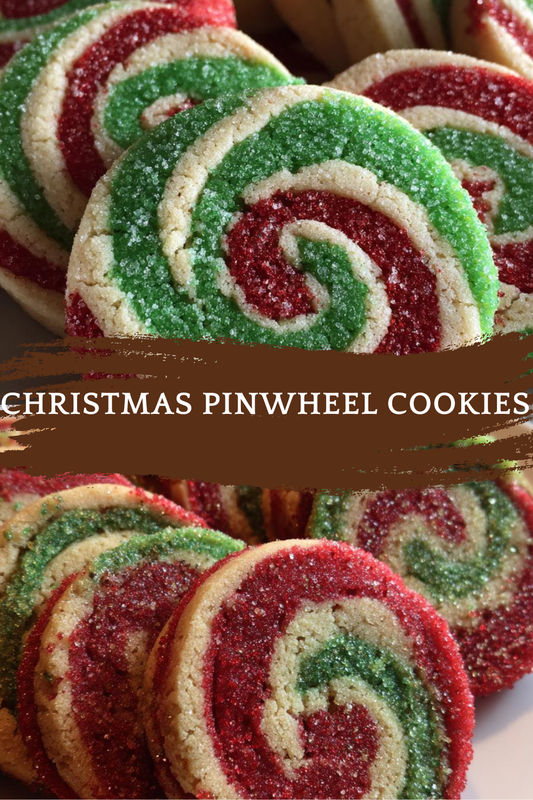
Introduction to Christmas Pinwheel Cookies
As the holiday season approaches, I find myself dreaming of festive treats that bring joy to my family. One of my absolute favorites is Christmas Pinwheel Cookies. These delightful cookies are not just a feast for the eyes; they’re a quick solution for busy days filled with holiday preparations. With their vibrant colors and delicious flavors, they’re sure to impress your loved ones. Plus, they’re a fun way to get the kids involved in the kitchen! Let’s dive into this easy recipe that will fill your home with warmth and cheer.
Print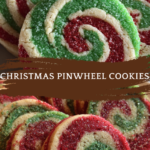
Christmas Pinwheel Cookies: Discover the Secret Recipe!
- Total Time: 1 hour 42 minutes
- Yield: 24 cookies
- Diet: Vegetarian
Description
Delicious and festive Christmas Pinwheel Cookies that are perfect for the holiday season.
Ingredients
- 1 cup unsalted butter, softened
- 1 cup granulated sugar
- 1 large egg
- 1 teaspoon vanilla extract
- 2 1/2 cups all-purpose flour
- 1/2 teaspoon baking powder
- 1/4 teaspoon salt
- 1/4 cup cocoa powder
- 1/4 cup red food coloring
- 1/4 cup green food coloring
Instructions
- Preheat the oven to 350°F (175°C).
- In a large bowl, cream together the butter and sugar until light and fluffy.
- Add the egg and vanilla extract, mixing until well combined.
- In another bowl, whisk together the flour, baking powder, and salt.
- Gradually add the dry ingredients to the wet mixture, mixing until a dough forms.
- Divide the dough into three equal parts.
- To one part, add cocoa powder and mix well.
- To the second part, add red food coloring and mix until fully incorporated.
- To the third part, add green food coloring and mix until fully incorporated.
- Roll out each colored dough between two sheets of parchment paper into rectangles.
- Layer the colored doughs on top of each other, then roll them up tightly into a log.
- Wrap the log in plastic wrap and refrigerate for at least 1 hour.
- Slice the log into 1/4 inch thick cookies and place them on a baking sheet.
- Bake for 10-12 minutes or until the edges are lightly golden.
- Let cool on a wire rack before serving.
Notes
- Make sure to chill the dough for easier slicing.
- These cookies can be decorated with icing or sprinkles for extra festivity.
- Store in an airtight container for up to a week.
- Prep Time: 30 minutes
- Cook Time: 12 minutes
- Category: Dessert
- Method: Baking
- Cuisine: American
Why You’ll Love This Christmas Pinwheel Cookies
These Christmas Pinwheel Cookies are a delightful blend of ease and flavor, making them perfect for busy moms and professionals alike. They come together quickly, allowing you to whip up a batch in no time. The vibrant colors and festive swirls not only look stunning on a holiday platter but also taste heavenly. Plus, they’re a wonderful way to create lasting memories with your family during the holiday season!
Ingredients for Christmas Pinwheel Cookies
Gathering the right ingredients is the first step to creating these festive delights. Here’s what you’ll need:
- Unsalted butter: This is the base of your cookies, providing richness and flavor. Make sure it’s softened for easy mixing.
- Granulated sugar: Sweetness is key! It helps create that delightful texture we all love in cookies.
- Large egg: This binds everything together and adds moisture, making your cookies tender.
- Vanilla extract: A splash of vanilla enhances the overall flavor, giving your cookies that warm, comforting taste.
- All-purpose flour: The backbone of your dough, it provides structure and stability to your cookies.
- Baking powder: This leavening agent helps your cookies rise, giving them a light and airy texture.
- Salt: Just a pinch balances the sweetness and enhances the flavors of the other ingredients.
- Cocoa powder: For the chocolatey layer, it adds depth and richness to your cookies.
- Red food coloring: This gives your cookies a festive pop of color, making them visually appealing.
- Green food coloring: Just like the red, this adds a cheerful hue, perfect for the holiday spirit.
For those looking to switch things up, consider using dark chocolate instead of cocoa powder for a richer flavor. You can also experiment with natural food colorings if you prefer a more organic approach. The exact quantities for each ingredient are listed at the bottom of the article, ready for you to print out and take to the kitchen!
How to Make Christmas Pinwheel Cookies
Now that we have our ingredients ready, let’s get to the fun part—making these beautiful Christmas Pinwheel Cookies! Follow these simple steps, and you’ll have a batch of festive cookies in no time.
Step 1: Preheat the Oven
First things first, preheat your oven to 350°F (175°C). Preheating is crucial because it ensures that your cookies bake evenly. A hot oven helps them rise and develop that perfect golden edge. Trust me, you don’t want to skip this step!
Step 2: Cream the Butter and Sugar
In a large bowl, cream together the softened butter and granulated sugar until the mixture is light and fluffy. This process is essential for creating a tender cookie texture. The air you incorporate while creaming will help your cookies rise beautifully!
Step 3: Add Egg and Vanilla
Next, add in the large egg and vanilla extract. Mix until everything is well combined. The egg binds the ingredients together, while the vanilla adds that warm, comforting flavor we all adore. It’s like a hug in cookie form!
Step 4: Combine Dry Ingredients
In another bowl, whisk together the all-purpose flour, baking powder, and salt. This step is important for a balanced dough. The baking powder will help your cookies rise, while the salt enhances the sweetness. Make sure there are no lumps!
Step 5: Form the Dough
Gradually add the dry ingredients to the wet mixture. Mix until a cohesive dough forms. Don’t overmix; just combine until you can’t see any dry flour. This will keep your cookies tender and not tough!
Step 6: Color the Dough
Now, divide the dough into three equal parts. To one part, add cocoa powder for that rich chocolate layer. To the second part, mix in red food coloring, and to the third, add green food coloring. Mix until the colors are fully incorporated. It’s like creating a festive rainbow!
Step 7: Roll Out the Dough
Roll out each colored dough between two sheets of parchment paper into rectangles. This prevents sticking and makes it easier to handle. Aim for about 1/4 inch thick. If the dough sticks, sprinkle a little flour on the parchment paper.
Step 8: Layer and Roll
Once you have your rectangles, layer the colored doughs on top of each other. Then, roll them up tightly into a log. This is where the magic happens! The layers will create those beautiful pinwheel swirls when you slice the cookies.
Step 9: Chill the Dough
Wrap the log in plastic wrap and refrigerate for at least 1 hour. Chilling the dough makes it easier to slice and helps the cookies hold their shape while baking. Patience is key here, but it’s worth the wait!
Step 10: Slice and Bake
Finally, slice the log into 1/4 inch thick cookies and place them on a baking sheet. Bake for 10-12 minutes or until the edges are lightly golden. Let them cool on a wire rack before serving. Your kitchen will smell heavenly, and your family will be eagerly waiting for a taste!
Tips for Success
- Make sure your butter is softened for easy creaming.
- Chill the dough thoroughly to prevent sticking while slicing.
- Use parchment paper to roll out the dough without mess.
- Experiment with different food colorings for unique designs.
- Keep an eye on the cookies while baking to avoid over-browning.
Equipment Needed
- Mixing bowls: A set of various sizes is handy; you can use any large bowl.
- Electric mixer: A hand mixer works great, but a stand mixer is even better.
- Parchment paper: If you don’t have it, wax paper can be a substitute.
- Baking sheet: Any flat baking tray will do; just ensure it’s lined.
- Plastic wrap: Use a reusable silicone wrap if you prefer an eco-friendly option.
Variations of Christmas Pinwheel Cookies
- Chocolate Mint: Add a few drops of peppermint extract to the dough for a refreshing twist.
- Nutty Delight: Incorporate finely chopped nuts like walnuts or pecans into the dough for added texture and flavor.
- Gluten-Free Option: Substitute all-purpose flour with a gluten-free blend to accommodate dietary needs.
- Spiced Version: Mix in a teaspoon of cinnamon or nutmeg for a warm, holiday spice flavor.
- Fruit Flavored: Use natural fruit powders or purees to create vibrant colors and fruity flavors.
Serving Suggestions for Christmas Pinwheel Cookies
- Pair these cookies with a warm cup of hot cocoa or spiced tea for a cozy treat.
- Serve on a festive platter, garnished with fresh mint leaves or edible glitter for a holiday touch.
- Consider adding a scoop of vanilla ice cream on the side for an indulgent dessert.
- Wrap a few cookies in cellophane and tie with a ribbon for a charming gift.
FAQs about Christmas Pinwheel Cookies
Can I make the dough ahead of time?
Absolutely! You can prepare the dough a day in advance and keep it wrapped in the fridge. Just remember to let it sit at room temperature for a few minutes before slicing.
How do I store leftover cookies?
Store your Christmas Pinwheel Cookies in an airtight container at room temperature. They’ll stay fresh for up to a week, but I doubt they’ll last that long!
Can I freeze these cookies?
Yes, you can freeze the sliced cookies before baking. Just place them on a baking sheet, freeze until solid, then transfer to a freezer bag. Bake straight from the freezer, adding a minute or two to the baking time.
What if I don’t have food coloring?
No worries! You can skip the food coloring altogether for a classic look or use natural alternatives like beet juice for red and spinach juice for green. Your cookies will still taste amazing!
Can I add other flavors to the dough?
Definitely! Feel free to experiment with different extracts like almond or lemon for a unique twist. Just remember to keep the balance of wet and dry ingredients in mind!
Final Thoughts
Making Christmas Pinwheel Cookies is more than just baking; it’s about creating cherished memories with family. The vibrant colors and delightful flavors bring a festive spirit to any gathering. I love watching my kids’ faces light up as they help roll the dough and slice the cookies. Each bite is a reminder of the joy and warmth of the holiday season. So, gather your loved ones, roll up your sleeves, and let the magic of these cookies fill your home with laughter and love. Trust me, they’ll become a beloved tradition in no time!