
Introduction to Eyeball Cake Pops
As a busy mom, I know how challenging it can be to whip up something fun and festive, especially when Halloween rolls around. That’s where these delightful Eyeball Cake Pops come in! They’re not just a treat; they’re a conversation starter that will have everyone giggling and reaching for more. Perfect for parties or a spooky family movie night, these cake pops are a quick solution for a busy day. Plus, they’re easy to make, so you can impress your loved ones without spending hours in the kitchen. Let’s dive into this deliciously eerie adventure!
Print
Eyeball Cake Pops: A Spooky Treat for Every Party!
- Total Time: 1 hour
- Yield: 24 cake pops
- Diet: Vegetarian
Description
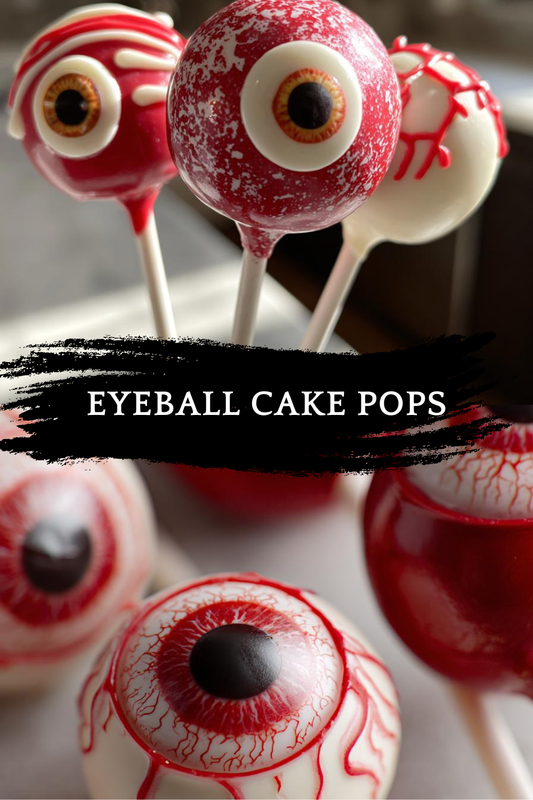
Eyeball Cake Pops are a fun and spooky treat perfect for Halloween parties or any festive gathering. These cake pops are designed to look like eyeballs, making them a hit among kids and adults alike.
Ingredients
- 1 box of cake mix
- 1 cup of frosting
- White chocolate melts
- Food coloring (red and black)
- Candy eyes
- Lollipop sticks
Instructions
- Prepare the cake mix according to package instructions and bake.
- Once cooled, crumble the cake into a large bowl.
- Add frosting to the crumbled cake and mix until combined.
- Form the mixture into balls and place them on a baking sheet.
- Chill the cake balls in the refrigerator for about 30 minutes.
- Melt the white chocolate melts in a microwave-safe bowl.
- Dip the lollipop sticks into the melted chocolate and insert them into the chilled cake balls.
- Coat the cake balls in the melted white chocolate and let them set.
- Use food coloring to create veins on the eyeballs and place candy eyes on top.
- Allow the cake pops to fully set before serving.
Notes
- For a more realistic look, use a toothpick to create veins with red food coloring.
- Store in a cool place to prevent melting.
- These can be made a day in advance for convenience.
- Prep Time: 30 minutes
- Cook Time: 30 minutes
- Category: Dessert
- Method: Baking and Decorating
- Cuisine: American
Why You’ll Love This Eyeball Cake Pops
These Eyeball Cake Pops are a game-changer for busy moms like us! They’re not only quick to make but also incredibly fun to decorate. The kids will love getting involved, turning a simple baking session into a memorable family activity. Plus, the taste is simply delightful—moist cake combined with creamy frosting, all wrapped in a sweet chocolate coating. It’s a spooky treat that brings smiles all around!
Ingredients for Eyeball Cake Pops
Gathering the right ingredients is half the fun! Here’s what you’ll need to create these spooky Eyeball Cake Pops:
- Cake mix: Any flavor you love works! Chocolate or vanilla are popular choices.
- Frosting: A creamy frosting binds the cake together. Choose your favorite flavor, but vanilla or cream cheese adds a nice touch.
- White chocolate melts: These create the spooky eyeball coating. You can find them in most grocery stores or craft stores.
- Food coloring: Red and black are essential for those creepy veins. Gel food coloring gives the best results!
- Candy eyes: These little guys are the finishing touch! You can find them in the baking aisle or online.
- Lollipop sticks: These hold your cake pops together. If you’re in a pinch, pretzel sticks can work too!
For exact quantities, check the bottom of the article where you can find everything available for printing. Happy baking!
How to Make Eyeball Cake Pops
Now that we have our ingredients ready, let’s get to the fun part—making these Eyeball Cake Pops! Follow these simple steps, and you’ll have a spooky treat that’s sure to impress.
Step 1: Prepare the Cake Mix
Start by preparing the cake mix according to the package instructions. This is where the magic begins! Bake it in a 9×13 inch pan for even cooking. The aroma of baking cake will fill your kitchen, making it feel like a cozy Halloween haven.
Step 2: Crumble the Cake
Once the cake has cooled completely, it’s time to crumble it into a large bowl. Use your hands or a fork to break it apart. The texture should be fine, almost like sand. This step is oddly satisfying, and you might find yourself sneaking a taste!
Step 3: Mix in the Frosting
Add the frosting to the crumbled cake. Mix it well until everything is combined. The mixture should be moist but not too sticky. If it feels too dry, add a bit more frosting. This is where the flavor really comes together, creating a deliciously sweet base for your cake pops.
Step 4: Form the Cake Balls
Now, it’s time to form the mixture into balls. Aim for about one inch in diameter. Roll them gently between your palms to get a nice round shape. Place the balls on a baking sheet lined with parchment paper. This is where your creativity starts to shine!
Step 5: Chill the Cake Balls
Pop the baking sheet into the refrigerator for about 30 minutes. Chilling helps the cake balls firm up, making them easier to dip later. While you wait, you can clean up your workspace or even plan your decorating strategy!
Step 6: Melt the White Chocolate
In a microwave-safe bowl, melt the white chocolate melts. Heat them in 30-second intervals, stirring in between until smooth. Be careful not to overheat! The melted chocolate should be silky and ready to coat your cake pops.
Step 7: Insert Lollipop Sticks
Take the chilled cake balls out of the fridge. Dip the tip of each lollipop stick into the melted chocolate, then insert it into the center of each cake ball. This helps the stick stay in place. It’s like giving your cake pops a little support!
Step 8: Coat the Cake Balls
Now, dip each cake ball into the melted white chocolate. Make sure they’re fully coated. Let the excess chocolate drip off before placing them back on the baking sheet. This is where they start to look like spooky eyeballs!
Step 9: Decorate the Eyeballs
Using red and black food coloring, create veins on the eyeballs. A toothpick works wonders for this! Finally, place a candy eye on top of each cake pop. This is the fun part—get creative with your designs!
Step 10: Let Them Set
Allow the cake pops to fully set at room temperature. If you’re in a hurry, you can pop them back in the fridge for a quicker set. Once they’re firm, they’re ready to be served. Enjoy the delighted reactions from your family and friends!
Tips for Success
- Use a cookie scoop for even-sized cake balls.
- Chill the cake balls longer if they feel too soft.
- Experiment with different cake flavors for unique tastes.
- Keep melted chocolate warm while working to avoid hardening.
- Have fun with decorations—let your kids get creative!
Equipment Needed
- Baking pan: A 9×13 inch pan works best for baking the cake.
- Mixing bowl: Use a large bowl for crumbling and mixing.
- Parchment paper: Line your baking sheet for easy cleanup.
- Microwave-safe bowl: For melting the chocolate.
- Toothpick: Handy for decorating those creepy veins!
Variations
- Gluten-Free: Use a gluten-free cake mix to make these Eyeball Cake Pops suitable for gluten-sensitive friends.
- Vegan: Substitute the cake mix with a vegan option and use dairy-free frosting and chocolate melts.
- Flavor Twists: Experiment with different cake flavors like red velvet or lemon for a unique spin.
- Colorful Eyeballs: Use colored chocolate melts to create vibrant eyeballs for a fun twist!
- Mini Cake Pops: Make smaller cake balls for bite-sized treats that are perfect for parties.
Serving Suggestions
- Pair these Eyeball Cake Pops with spooky-themed drinks like a witch’s brew punch or apple cider.
- Serve on a decorative platter with fake spider webs for a festive touch.
- Include a variety of Halloween treats for a fun dessert table.
- Wrap them in clear bags tied with orange ribbons for party favors.
FAQs about Eyeball Cake Pops
Can I make Eyeball Cake Pops in advance?
Absolutely! These spooky treats can be made a day in advance. Just store them in a cool place to keep them fresh and prevent melting. They’ll be ready to impress your guests when the party starts!
What can I use instead of lollipop sticks?
If you don’t have lollipop sticks on hand, pretzel sticks work great as an alternative. They add a fun twist and a bit of crunch to your Eyeball Cake Pops!
How do I store leftover cake pops?
Store any leftover Eyeball Cake Pops in an airtight container in the refrigerator. They’ll stay fresh for up to a week, but I doubt they’ll last that long!
Can I use different colors for the eyeballs?
Of course! Feel free to get creative with your food coloring. You can use vibrant colors for a fun twist or stick to traditional red and black for a classic spooky look.
What’s the best way to decorate the eyeballs?
Using a toothpick to create veins with red food coloring is a fun technique! You can also experiment with edible glitter or sprinkles for a unique touch. Let your imagination run wild!
Final Thoughts
Creating these Eyeball Cake Pops is more than just baking; it’s about making memories with your loved ones. The laughter shared while decorating and the delight on everyone’s faces when they see these spooky treats are priceless. Whether it’s a Halloween party or a cozy family night, these cake pops bring a touch of fun and creativity to the table. Plus, they’re a fantastic way to get the kids involved in the kitchen! So, roll up your sleeves, embrace the mess, and enjoy the sweet satisfaction of making something truly special together. Happy baking!