
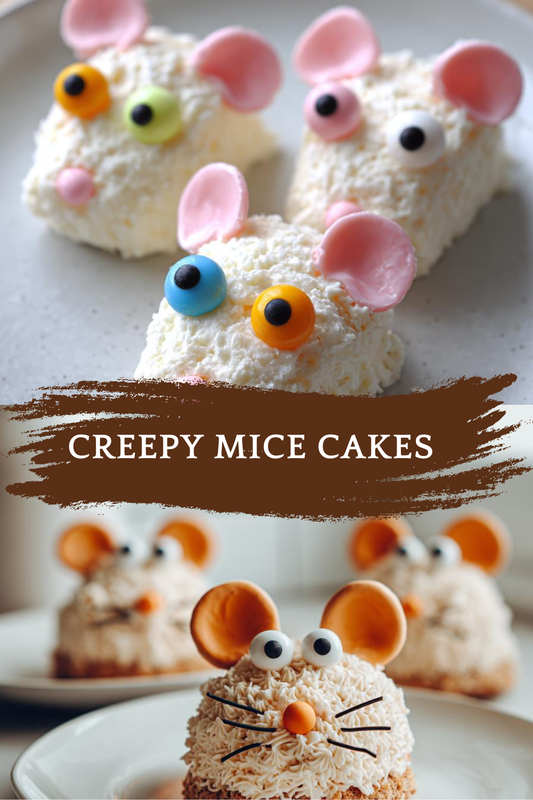
Introduction to Creepy Mice Cakes
As a busy mom, I know how challenging it can be to whip up something special, especially when Halloween rolls around. That’s why I absolutely adore these Creepy Mice Cakes! They’re not just adorable; they’re a quick solution for a festive treat that will impress your family and friends. Imagine the delight on your kids’ faces when they see these little chocolate mice at your next gathering. With just a few simple ingredients and steps, you can create a spooky dessert that’s both fun and delicious. Let’s dive into this delightful baking adventure!
Print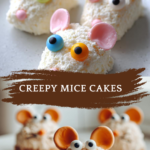
Creepy Mice Cakes: Uncover Deliciously Spooky Treats!
- Total Time: 50 minutes
- Yield: 12 servings
- Diet: Vegetarian
Description
Creepy Mice Cakes are delightful and spooky treats perfect for Halloween or any themed party. These adorable cakes are shaped like little mice and are sure to impress your guests.
Ingredients
- 1 box of chocolate cake mix
- 3 eggs
- 1 cup of water
- 1/2 cup of vegetable oil
- 1 can of chocolate frosting
- Mini chocolate chips (for eyes)
- Red candy melts (for noses)
- Marzipan or fondant (for ears)
Instructions
- Preheat the oven to 350°F (175°C).
- Prepare the chocolate cake mix according to the package instructions.
- Pour the batter into a greased cake pan and bake for 25-30 minutes.
- Allow the cake to cool completely before removing it from the pan.
- Once cooled, cut the cake into small oval shapes to form the bodies of the mice.
- Frost each cake with chocolate frosting.
- Attach mini chocolate chips for the eyes and red candy melts for the noses.
- Use marzipan or fondant to create ears and attach them to the top of each cake.
- Serve and enjoy your creepy mice cakes!
Notes
- For a fun twist, you can use different flavors of cake mix.
- Make sure to let the cakes cool completely before frosting.
- These cakes can be made a day in advance and stored in an airtight container.
- Prep Time: 20 minutes
- Cook Time: 30 minutes
- Category: Dessert
- Method: Baking
- Cuisine: American
Why You’ll Love This Creepy Mice Cakes
These Creepy Mice Cakes are a breeze to make, perfect for busy days when you want to add a touch of fun to your dessert table. They’re not only quick to prepare but also incredibly tasty, with rich chocolate flavor that everyone loves. Plus, the kids can help decorate, making it a delightful family activity. Trust me, these spooky treats will be the highlight of any Halloween party!
Ingredients for Creepy Mice Cakes
Gathering the right ingredients is the first step to creating these delightful Creepy Mice Cakes. Here’s what you’ll need:
- Chocolate cake mix: This is the base of our mice. It brings that rich, chocolaty goodness that everyone loves.
- Eggs: Essential for binding the ingredients together, eggs help give the cake its fluffy texture.
- Water: This helps to hydrate the cake mix, ensuring a moist and delicious cake.
- Vegetable oil: Adding oil keeps the cake tender and adds moisture, making each bite melt in your mouth.
- Chocolate frosting: The perfect topping to give our mice their spooky look and delicious flavor.
- Mini chocolate chips: These little gems serve as the eyes, adding a fun touch to our creepy creations.
- Red candy melts: These are used for the noses, giving our mice a pop of color and a playful vibe.
- Marzipan or fondant: Use these to create the ears. They’re easy to mold and add a cute finishing touch.
For those looking to mix things up, consider using different flavors of cake mix, like vanilla or red velvet, for a unique twist. You can find all the exact measurements at the bottom of the article, ready for printing!
How to Make Creepy Mice Cakes
Now that we have our ingredients ready, let’s jump into the fun part—making these adorable Creepy Mice Cakes! Follow these simple steps, and you’ll have a spooky treat that’s sure to impress.
Step 1: Preheat the Oven
First things first, preheat your oven to 350°F (175°C). Preheating is crucial because it ensures that your cakes bake evenly. A hot oven helps the cake rise beautifully, giving it that fluffy texture we all love.
Step 2: Prepare the Cake Mix
Next, grab your chocolate cake mix and follow the package instructions. Usually, this means mixing the cake mix with eggs, water, and vegetable oil. Stir until everything is well combined. The batter should be smooth and free of lumps, ready to transform into delicious mice!
Step 3: Bake the Cakes
Pour the batter into a greased cake pan. Make sure to spread it evenly. Bake in the preheated oven for about 25-30 minutes. You’ll know they’re done when a toothpick inserted in the center comes out clean. The aroma of chocolate will fill your kitchen, making it hard to resist sneaking a taste!
Step 4: Cool the Cakes
Once baked, let the cakes cool completely in the pan. This step is essential! If you frost them too soon, the frosting will melt and slide off. Patience is key here, so grab a cup of tea and relax while they cool.
Step 5: Shape the Mice
After the cakes have cooled, it’s time to get creative! Cut the cake into small oval shapes to form the bodies of the mice. You can make them as big or small as you like. Just remember, the cuter, the better!
Step 6: Frost the Cakes
Now, it’s time to frost! Take your chocolate frosting and spread it generously over each shaped cake. This is where the magic happens. The frosting not only adds flavor but also gives our mice that spooky look. Don’t be shy—make it thick and luscious!
Step 7: Add the Features
Let’s bring these mice to life! Attach mini chocolate chips for the eyes and red candy melts for the noses. Use a little frosting to help them stick. This is the fun part where you can get creative with expressions. Make them cute or a bit creepy—your choice!
Step 8: Create Ears
Finally, use marzipan or fondant to create the ears. Roll them into small shapes and attach them to the top of each cake. This little detail makes all the difference, giving your Creepy Mice Cakes their adorable character. Now, they’re ready to be served!
Tips for Success
- Always let your cakes cool completely before frosting to avoid melting.
- Use a serrated knife for cutting the cake; it creates cleaner edges.
- Experiment with different cake flavors for a fun twist on the classic recipe.
- Get the kids involved in decorating; it makes for a memorable family activity.
- Store any leftovers in an airtight container to keep them fresh.
Equipment Needed
- Cake pan: A standard 9×13 inch pan works well, but you can use any shape you have on hand.
- Mixing bowl: A large bowl for combining your ingredients; a stand mixer can save time.
- Spatula: Perfect for spreading frosting and scraping down the sides of the bowl.
- Knife: A serrated knife is ideal for cutting the cake into shapes.
- Toothpick: Use this to check if your cakes are done baking.
Variations of Creepy Mice Cakes
- Gluten-Free Option: Use a gluten-free chocolate cake mix to make these treats suitable for those with gluten sensitivities.
- Vegan Version: Substitute eggs with flaxseed meal and use a plant-based frosting for a delicious vegan treat.
- Flavor Twists: Try using red velvet or lemon cake mix for a fun flavor change that still looks adorable!
- Healthier Frosting: Opt for a lighter frosting made from Greek yogurt mixed with cocoa powder for a healthier alternative.
- Nutty Addition: Add crushed nuts or nut butter to the cake batter for an extra crunch and flavor boost.
Serving Suggestions for Creepy Mice Cakes
- Pair with Milk: A glass of cold milk complements the rich chocolate flavor perfectly.
- Halloween-Themed Plates: Serve on spooky plates or platters to enhance the festive vibe.
- Garnish with Sprinkles: Add colorful sprinkles around the cakes for a fun touch.
- Serve with Ice Cream: A scoop of vanilla ice cream makes for a delightful dessert combo.
- Display Creatively: Arrange the cakes on a tiered stand for an eye-catching presentation.
FAQs about Creepy Mice Cakes
Can I make Creepy Mice Cakes in advance?
Absolutely! These spooky treats can be made a day ahead. Just store them in an airtight container to keep them fresh. This way, you can enjoy more time with your guests on the big day!
What if I don’t have marzipan or fondant for the ears?
No worries! You can use chocolate or even slices of fruit like apple or pear for the ears. Get creative with what you have on hand!
Can I use a different cake flavor for my Creepy Mice Cakes?
Definitely! While chocolate is a classic choice, feel free to experiment with vanilla, red velvet, or even lemon cake mix. Each flavor will give your mice a unique twist!
How do I store leftover Creepy Mice Cakes?
Store any leftovers in an airtight container at room temperature for up to three days. If you want to keep them longer, consider refrigerating them, but let them come to room temperature before serving.
Can kids help with making these cakes?
Yes! This recipe is perfect for involving kids. They can help with frosting, adding features, and decorating. It’s a fun family activity that creates lasting memories!
Final Thoughts
Creating these Creepy Mice Cakes is more than just baking; it’s about making memories with your loved ones. The joy on your kids’ faces as they help decorate these spooky treats is priceless. Plus, the rich chocolate flavor is sure to satisfy any sweet tooth. Whether it’s for Halloween or a fun family gathering, these cakes are a delightful way to bring everyone together. So, roll up your sleeves, gather your ingredients, and let the laughter and creativity flow in your kitchen. Trust me, these little mice will steal the show and your heart!