
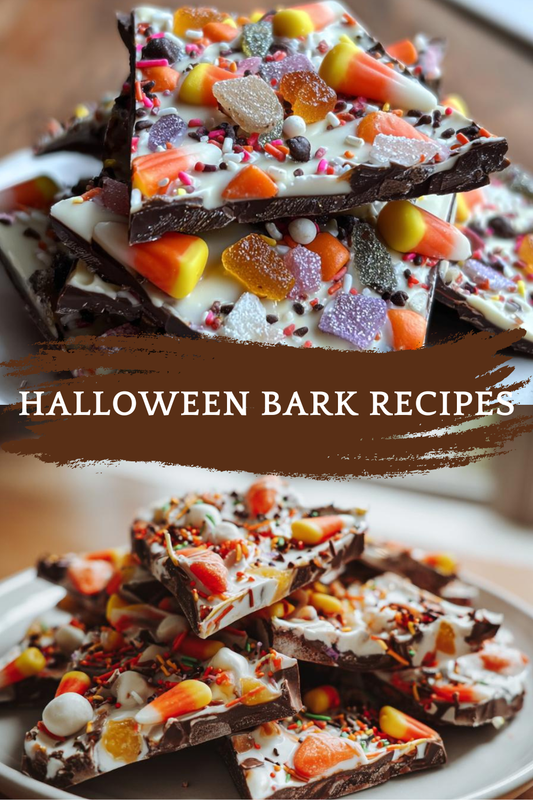
Introduction to Halloween Bark
As the leaves turn and the air gets crisp, I find myself dreaming of festive treats. Halloween Bark is one of those delightful recipes that brings a smile to everyone’s face. It’s not just a treat; it’s a canvas for creativity! Perfect for busy moms like us, this no-bake dessert comes together in a flash. Whether you’re hosting a spooky gathering or just want to surprise your family, this Halloween Bark is sure to impress. Plus, it’s a fun way to get the kids involved in the kitchen. Let’s dive into this sweet adventure!
Print
“Halloween Bark: The Ultimate Treat to Spook Your Guests!”
- Total Time: 1 hour 20 minutes
- Yield: 24 pieces
- Diet: Vegetarian
Description
Halloween Bark is a festive and delicious treat perfect for Halloween parties, combining chocolate with colorful candies and spooky decorations.
Ingredients
- 12 oz dark chocolate chips
- 12 oz white chocolate chips
- 1 cup candy corn
- 1 cup Halloween-themed sprinkles
- 1 cup pretzel pieces
Instructions
- Line a baking sheet with parchment paper.
- Melt the dark chocolate chips in a microwave-safe bowl, stirring every 30 seconds until smooth.
- Spread the melted dark chocolate evenly on the prepared baking sheet.
- Melt the white chocolate chips in a separate bowl and drizzle over the dark chocolate.
- Use a toothpick to swirl the two chocolates together for a marbled effect.
- Sprinkle candy corn, sprinkles, and pretzel pieces over the chocolate.
- Refrigerate for about 1 hour or until set.
- Break into pieces and serve.
Notes
- Store in an airtight container at room temperature.
- Feel free to customize with your favorite Halloween candies.
- For a more intense flavor, add a pinch of sea salt on top before refrigerating.
- Prep Time: 15 minutes
- Cook Time: 5 minutes
- Category: Dessert
- Method: No-Bake
- Cuisine: American
Why You’ll Love This Halloween Bark
This Halloween Bark is a lifesaver for busy days. It’s quick to whip up, taking just 15 minutes of prep time. The combination of rich chocolate and colorful candies creates a treat that’s as delicious as it is festive. Plus, it’s a no-bake recipe, so you won’t heat up the kitchen. Your family will love the sweet crunch, and you’ll love how easy it is to make!
Ingredients for Halloween Bark
Gathering the right ingredients is half the fun! Here’s what you’ll need to create your spooky masterpiece:
- Dark chocolate chips: The rich, deep flavor of dark chocolate forms the base of your bark. It’s perfect for balancing the sweetness of the other ingredients.
- White chocolate chips: These add a creamy contrast and a beautiful marbled effect. If you prefer, you can use yogurt-covered candies for a tangy twist.
- Candy corn: A Halloween classic! These colorful candies bring a festive flair and a chewy texture that kids adore.
- Halloween-themed sprinkles: These little gems add a pop of color and fun. Feel free to get creative with your favorite shapes!
- Pretzel pieces: The salty crunch of pretzels provides a delightful contrast to the sweetness. You can swap them for nuts if you prefer a nutty flavor.
For those who want to customize, consider adding your favorite Halloween candies or a sprinkle of sea salt for an extra flavor boost. The exact quantities are listed at the bottom of the article for easy reference and printing!
How to Make Halloween Bark
Now that you have your ingredients ready, let’s get started on making this delightful Halloween Bark! Follow these simple steps, and you’ll have a spooky treat in no time.
Step 1: Prepare Your Baking Sheet
First things first, line a baking sheet with parchment paper. This makes it super easy to lift the bark out once it’s set. Just press the parchment down so it sticks to the sheet. No one wants a sticky situation!
Step 2: Melt the Dark Chocolate
Next, grab a microwave-safe bowl and add your dark chocolate chips. Microwave them in 30-second intervals, stirring in between. This helps prevent burning. Keep going until the chocolate is smooth and glossy. It’s like magic watching it transform!
Step 3: Spread the Dark Chocolate
Once your dark chocolate is melted, pour it onto the prepared baking sheet. Use a spatula to spread it evenly. Aim for a nice, thick layer. This will be the delicious base of your Halloween Bark!
Step 4: Melt the White Chocolate
Now, it’s time to melt the white chocolate chips. Use a separate microwave-safe bowl and repeat the same process as before. Stir every 30 seconds until it’s silky smooth. The contrast of white against dark is going to look stunning!
Step 5: Drizzle and Swirl
With both chocolates ready, drizzle the melted white chocolate over the dark chocolate. Don’t worry about being perfect; a little mess adds to the charm! Then, take a toothpick and gently swirl the two chocolates together. This creates a beautiful marbled effect that’s as fun to look at as it is to eat.
Step 6: Add Toppings
Now comes the fun part! Sprinkle your candy corn, Halloween-themed sprinkles, and pretzel pieces over the chocolate. Be generous! Each bite should be a delightful surprise. The colors and textures will make your Halloween Bark pop!
Step 7: Refrigerate
Once you’ve added all your toppings, it’s time to refrigerate. Place the baking sheet in the fridge for about an hour. This helps the chocolate set perfectly. You’ll know it’s ready when it’s firm to the touch.
Step 8: Break and Serve
Finally, take your Halloween Bark out of the fridge. Lift the parchment paper to remove the bark from the baking sheet. Break it into pieces—no need for perfection here! Serve it up on a festive platter, and watch your guests’ faces light up with joy!
Tips for Success
- Make sure to stir the chocolate frequently while melting to avoid burning.
- Use a spatula to spread the chocolate evenly for a uniform thickness.
- Don’t be shy with the toppings; the more, the merrier!
- For a fun twist, try adding crushed cookies or dried fruit.
- Keep an eye on the fridge; it should set for about an hour.
Equipment Needed
- Baking sheet: A standard size works well, but a larger one gives you more space.
- Parchment paper: If you don’t have this, aluminum foil can be a good substitute.
- Microwave-safe bowls: Any heatproof bowl will do, just ensure it’s large enough for melting.
- Spatula: A rubber spatula is great for spreading, but a spoon works too!
- Toothpick: If you don’t have one, a skewer or fork can help with swirling.
Variations
- Nutty Delight: Add chopped nuts like almonds or pecans for a crunchy twist.
- Fruit Fusion: Incorporate dried fruits such as cranberries or apricots for a chewy texture.
- Spicy Kick: Sprinkle a pinch of cayenne pepper or chili powder for a surprising heat.
- Vegan Option: Use dairy-free chocolate chips and ensure your sprinkles are vegan-friendly.
- Gluten-Free: Swap pretzel pieces for gluten-free pretzels or simply use nuts.
Serving Suggestions
- Pair your Halloween Bark with a warm cup of apple cider for a cozy treat.
- Serve it alongside spooky-themed cupcakes for a festive dessert table.
- Present the bark on a colorful platter, garnished with mini pumpkins for a seasonal touch.
- Wrap pieces in clear bags tied with orange ribbons for a fun party favor.
- Enjoy it with a scoop of vanilla ice cream for an indulgent dessert experience.
FAQs about Halloween Bark
Can I use milk chocolate instead of dark chocolate?
Absolutely! If you prefer a sweeter taste, milk chocolate works wonderfully. Just remember, it will change the flavor profile a bit, but it’ll still be delicious!
How long does Halloween Bark last?
When stored in an airtight container at room temperature, your Halloween Bark can last up to two weeks. Just try not to eat it all at once!
Can I make Halloween Bark ahead of time?
Yes! This treat is perfect for prepping in advance. Make it a few days before your Halloween party, and it’ll be ready to impress your guests!
What can I substitute for candy corn?
If candy corn isn’t your thing, feel free to swap it out for other candies like M&M’s or gummy worms. Get creative with your favorite Halloween treats!
Is Halloween Bark suitable for kids?
Definitely! This fun and colorful treat is a hit with kids. Just keep an eye on the toppings to ensure they’re age-appropriate. Enjoy making it together!
Final Thoughts
Creating Halloween Bark is more than just making a treat; it’s about sharing joy and laughter with loved ones. The vibrant colors and delightful crunch make it a perfect centerpiece for any Halloween gathering. I love how this recipe invites creativity, allowing you to customize it with your favorite candies. Plus, it’s a fantastic way to involve the kids in the kitchen, turning a simple task into a fun family activity. So, gather your ingredients, unleash your inner artist, and enjoy the sweet rewards of your Halloween Bark. Trust me, it’ll be a hit with everyone!