
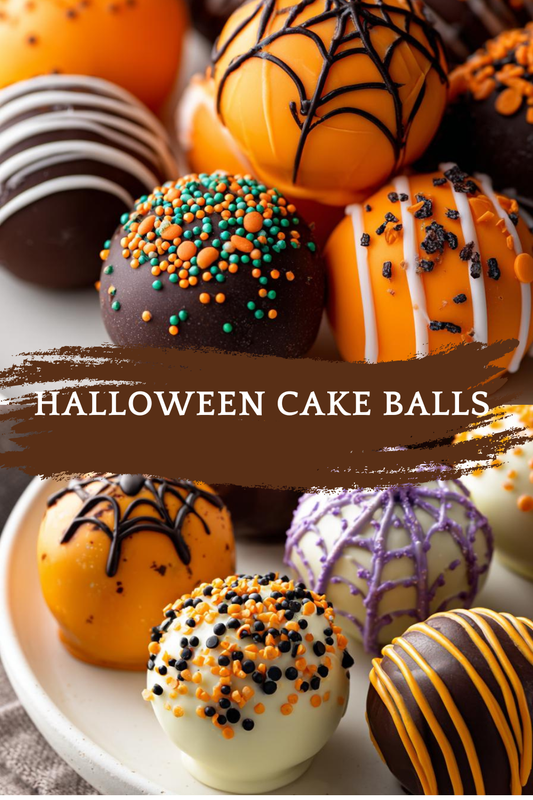
Introduction to Halloween Cake Balls
As the leaves turn and the air gets crisp, I find myself dreaming of delightful treats that capture the spirit of Halloween. That’s where these Halloween Cake Balls come in! They’re not just any dessert; they’re little bites of joy that can impress your guests without taking hours in the kitchen. Perfect for busy moms like me, this recipe is a quick solution for a festive gathering. With just a few simple steps, you can create these spooky delights that will have everyone raving. Trust me, your loved ones will be begging for more!
Print
Halloween Cake Balls: Delightful Treats to Impress Guests!
- Total Time: 1 hour
- Yield: 24 cake balls
- Diet: Vegetarian
Description
Halloween Cake Balls are delightful and spooky treats perfect for impressing guests at any Halloween gathering.
Ingredients
- 1 box of chocolate cake mix
- 1 cup of frosting (any flavor)
- 1 cup of white chocolate chips
- 1 tablespoon of vegetable oil
- Food coloring (orange and black)
- Sprinkles (Halloween-themed)
Instructions
- Prepare the chocolate cake mix according to package instructions and bake in a 9×13 inch pan.
- Once cooled, crumble the cake into a large bowl.
- Add the frosting to the crumbled cake and mix until well combined.
- Form the mixture into small balls and place them on a baking sheet lined with parchment paper.
- Chill the cake balls in the refrigerator for at least 30 minutes.
- In a microwave-safe bowl, melt the white chocolate chips with vegetable oil until smooth.
- Add food coloring to the melted chocolate to achieve desired Halloween colors.
- Dip each cake ball into the colored chocolate and place back on the parchment paper.
- Before the chocolate sets, sprinkle with Halloween-themed sprinkles.
- Allow the cake balls to set completely before serving.
Notes
- For a richer flavor, use cream cheese frosting instead of regular frosting.
- Store the cake balls in an airtight container in the refrigerator for up to a week.
- Feel free to customize the colors and decorations to match your Halloween theme.
- Prep Time: 20 minutes
- Cook Time: 30 minutes
- Category: Dessert
- Method: Baking and Chilling
- Cuisine: American
Why You’ll Love This Halloween Cake Balls
These Halloween Cake Balls are a game-changer for any busy kitchen! They’re incredibly easy to whip up, making them perfect for last-minute gatherings. Plus, the rich chocolate flavor combined with festive colors is sure to delight both kids and adults alike. You can customize them to fit your Halloween theme, ensuring they not only taste great but look fabulous too. Who doesn’t love a treat that’s both fun and delicious?
Ingredients for Halloween Cake Balls
Gathering the right ingredients is half the fun! Here’s what you’ll need to create these delightful Halloween Cake Balls:
- Chocolate cake mix: This is the base of our cake balls, providing that rich, chocolatey goodness we all crave.
- Frosting: Any flavor will do, but I love using cream cheese frosting for a tangy twist. It adds a delightful creaminess to the cake balls.
- White chocolate chips: These are melted and used for coating the cake balls, giving them a smooth, sweet finish.
- Vegetable oil: A little oil helps the chocolate melt smoothly, ensuring a perfect dip for your cake balls.
- Food coloring: Orange and black are the classic Halloween colors, but feel free to get creative! You can use any colors that match your spooky theme.
- Sprinkles: Halloween-themed sprinkles add a festive touch and make your cake balls look extra special. Think ghosts, pumpkins, or even bats!
For exact quantities, check the bottom of the article where you can find everything available for printing. Happy baking!
How to Make Halloween Cake Balls
Now that we have our ingredients ready, let’s dive into the fun part—making these Halloween Cake Balls! Follow these simple steps, and you’ll have a spooky treat that’s sure to impress.
Step 1: Prepare the Cake
Start by preparing the chocolate cake mix according to the package instructions. Pour the batter into a 9×13 inch pan and bake until a toothpick comes out clean. The aroma of chocolate will fill your kitchen, making it feel like Halloween already!
Step 2: Crumble the Cake
Once the cake has cooled completely, it’s time to crumble it. Use your hands or a fork to break the cake into fine crumbs in a large bowl. This step is like therapy for me—there’s something satisfying about crumbling cake!
Step 3: Mix with Frosting
Next, add your chosen frosting to the crumbled cake. Mix it all together until it’s well combined. The mixture should be moist but not too sticky. If it feels too dry, add a bit more frosting. This is where the magic happens!
Step 4: Form the Balls
Now, it’s time to form the mixture into small balls. I like to use a cookie scoop for uniformity, but your hands work just fine too. Place each ball on a baking sheet lined with parchment paper. This is where your spooky treats start taking shape!
Step 5: Chill the Cake Balls
Chilling is crucial! Pop the baking sheet into the refrigerator for at least 30 minutes. This helps the cake balls firm up, making them easier to dip later. Plus, it gives you a moment to relax with a cup of coffee!
Step 6: Melt the Chocolate
While the cake balls chill, melt the white chocolate chips with a tablespoon of vegetable oil in a microwave-safe bowl. Heat in short bursts, stirring in between, until smooth. The oil helps the chocolate coat the cake balls beautifully.
Step 7: Color the Chocolate
Once melted, it’s time to add some Halloween flair! Stir in your food coloring until you achieve the desired shades of orange and black. This is where you can let your creativity shine—don’t be afraid to mix it up!
Step 8: Dip the Cake Balls
Now comes the fun part—dipping! Take each chilled cake ball and dip it into the colored chocolate, ensuring it’s fully coated. Let the excess chocolate drip off before placing it back on the parchment paper. It’s like giving each ball a little Halloween costume!
Step 9: Add Sprinkles
Before the chocolate sets, sprinkle your Halloween-themed sprinkles on top. This adds a festive touch and makes your cake balls look extra special. I love using a mix of ghosts and pumpkins for a fun effect!
Step 10: Set and Serve
Finally, allow the cake balls to set completely before serving. You can speed up the process by placing them in the fridge for a bit. Once set, they’re ready to be devoured! Trust me, these Halloween Cake Balls will be the star of your gathering!
Tips for Success
- Make sure your cake is completely cool before crumbling; this prevents a gooey mess.
- Use a cookie scoop for even-sized cake balls; it makes the process quicker and easier.
- Don’t skip the chilling step; it’s essential for easy dipping and shaping.
- Experiment with different frosting flavors for unique taste combinations.
- Have fun with the sprinkles—mix and match for a festive look!
Equipment Needed
- 9×13 inch baking pan: Any baking dish will work, but this size is perfect for our cake.
- Mixing bowl: A large bowl is essential for mixing the cake and frosting.
- Baking sheet: Line it with parchment paper for easy cleanup.
- Cookie scoop: This helps form uniform cake balls, but your hands will do just fine!
- Microwave-safe bowl: For melting the chocolate; any heatproof bowl will work.
Variations of Halloween Cake Balls
- Red Velvet Cake Balls: Swap the chocolate cake mix for red velvet for a festive twist. The vibrant color is perfect for Halloween!
- Gluten-Free Option: Use a gluten-free cake mix to make these treats suitable for those with dietary restrictions.
- Vegan Version: Substitute the frosting with a vegan option and use dairy-free chocolate chips for a plant-based delight.
- Nutty Surprise: Add crushed nuts or nut butter to the cake mixture for an extra crunch and flavor boost.
- Spiced Pumpkin Cake Balls: Use pumpkin spice cake mix and cream cheese frosting for a seasonal flavor that screams fall!
Serving Suggestions for Halloween Cake Balls
- Pair with a spooky punch or apple cider for a festive drink option.
- Serve on a decorative platter with Halloween-themed decorations for an eye-catching display.
- Include a variety of treats like caramel apples or ghost-shaped cookies for a fun dessert table.
- Use colorful cupcake liners to add a pop of color and make serving easier.
- Consider adding a small sign labeling the cake balls for a personal touch!
FAQs about Halloween Cake Balls
Can I make Halloween Cake Balls ahead of time?
Absolutely! You can prepare the cake balls a day in advance. Just store them in an airtight container in the refrigerator. This makes them a perfect treat for busy moms like us!
What can I use instead of white chocolate?
If white chocolate isn’t your thing, you can use milk chocolate or dark chocolate instead. Just melt it the same way, and you’ll still have delicious Halloween Cake Balls!
How do I store leftover cake balls?
Store any leftover cake balls in an airtight container in the fridge. They’ll stay fresh for up to a week, making them a great treat for snacking throughout the week!
Can I freeze Halloween Cake Balls?
Yes, you can freeze them! Just make sure they’re fully set before placing them in a freezer-safe container. They can last up to three months in the freezer.
What other flavors can I try for the cake balls?
The possibilities are endless! You can experiment with flavors like lemon, strawberry, or even funfetti. Just remember to match the frosting to your cake flavor for the best results!
Final Thoughts
Creating these Halloween Cake Balls is more than just baking; it’s about bringing joy to your home. The laughter of kids, the smiles of friends, and the delightful chaos of a Halloween gathering all come together with these treats. Each bite is a reminder of the fun and creativity that this season brings. Plus, they’re so easy to make that even the busiest of moms can whip them up without breaking a sweat. So, roll up your sleeves, get your family involved, and enjoy the sweet moments that come with making these spooky delights!