
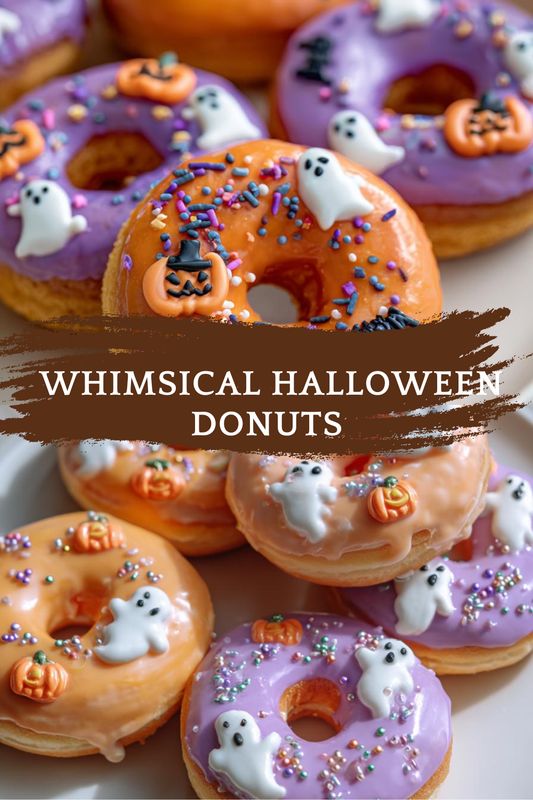
Introduction to Whimsical Halloween Donuts
As the leaves turn and the air gets crisp, I find myself dreaming of festive treats that bring a smile to my family’s faces. These whimsical Halloween donuts are just the ticket! They’re not only a delightful way to celebrate the spooky season, but they also make for a quick solution on those busy days when time is tight. With vibrant colors and playful designs, these donuts are sure to impress your loved ones. Plus, they’re a fun activity to whip up with the kids, creating sweet memories in the kitchen together!
Print
Whimsical Halloween Donuts That Delight Every Bite!
- Total Time: 32 minutes
- Yield: 12 donuts
- Diet: Vegetarian
Description
These whimsical Halloween donuts are a fun and delicious treat perfect for the spooky season, featuring vibrant colors and playful designs.
Ingredients
- 2 cups all-purpose flour
- 1 cup granulated sugar
- 1/2 cup unsweetened cocoa powder
- 1 tablespoon baking powder
- 1/2 teaspoon salt
- 2 large eggs
- 1 cup milk
- 1/4 cup vegetable oil
- 1 teaspoon vanilla extract
- Food coloring (orange, purple, green)
- 1 cup powdered sugar (for glaze)
- Sprinkles (for decoration)
Instructions
- Preheat the oven to 350°F (175°C) and grease a donut pan.
- In a large bowl, mix together the flour, sugar, cocoa powder, baking powder, and salt.
- In another bowl, whisk the eggs, milk, vegetable oil, and vanilla extract.
- Combine the wet ingredients with the dry ingredients until just mixed.
- Divide the batter into three bowls and add food coloring to each bowl to create different colors.
- Spoon the colored batter into the donut pan, swirling them together for a marbled effect.
- Bake for 10-12 minutes or until a toothpick comes out clean.
- Let the donuts cool before glazing.
- Mix powdered sugar with a little water to create a glaze and dip the donuts in it.
- Decorate with sprinkles and let the glaze set before serving.
Notes
- For a vegan version, substitute eggs with flax eggs and use plant-based milk.
- Store leftovers in an airtight container for up to 3 days.
- Feel free to customize the decorations based on your Halloween theme.
- Prep Time: 20 minutes
- Cook Time: 12 minutes
- Category: Dessert
- Method: Baking
- Cuisine: American
Why You’ll Love This Whimsical Halloween Donuts
These whimsical Halloween donuts are a breeze to make, perfect for busy moms like me! In just over half an hour, you can create a batch that’s not only delicious but also visually stunning. The rich chocolate flavor paired with vibrant colors makes them irresistible. Plus, they’re a fantastic way to get the kids involved in the kitchen, turning a simple baking session into a fun family tradition!
Ingredients for Whimsical Halloween Donuts
Gathering the right ingredients is half the fun! Here’s what you’ll need to create these delightful whimsical Halloween donuts:
- All-purpose flour: The base of our donuts, giving them that fluffy texture.
- Granulated sugar: Sweetness is key! It balances the cocoa and adds a lovely crunch.
- Unsweetened cocoa powder: This adds a rich chocolate flavor, making every bite decadent.
- Baking powder: The magic ingredient that helps our donuts rise and become light.
- Salt: Just a pinch enhances all the flavors, making them pop!
- Large eggs: They provide structure and moisture, keeping the donuts tender.
- Milk: Adds creaminess and helps blend the ingredients smoothly.
- Vegetable oil: Keeps the donuts moist and adds a subtle richness.
- Vanilla extract: A splash of this brings warmth and depth to the flavor.
- Food coloring: Choose orange, purple, and green to create that festive Halloween vibe!
- Powdered sugar: For the glaze, it gives that sweet, shiny finish we all love.
- Sprinkles: The fun part! Use them to decorate and add a playful touch.
For those looking to customize, you can swap out the eggs for flax eggs for a vegan version. And if you’re out of milk, any plant-based milk works just as well! You’ll find the exact quantities for each ingredient at the bottom of the article, ready for printing.
How to Make Whimsical Halloween Donuts
Now that we have our ingredients ready, let’s dive into the fun part—making these whimsical Halloween donuts! Follow these simple steps, and you’ll have a batch of delightful treats in no time.
Step 1: Preheat and Prepare
First things first, preheat your oven to 350°F (175°C). This ensures your donuts bake evenly. While the oven warms up, grease your donut pan with a little vegetable oil or non-stick spray. This will help your donuts pop out easily once they’re baked.
Step 2: Mix Dry Ingredients
In a large bowl, combine the all-purpose flour, granulated sugar, cocoa powder, baking powder, and salt. Whisk them together until they’re well mixed. This step is crucial because it ensures that the baking powder is evenly distributed, giving your donuts that perfect rise.
Step 3: Whisk Wet Ingredients
In another bowl, whisk together the eggs, milk, vegetable oil, and vanilla extract. Make sure everything is blended well. The wet ingredients bring moisture and flavor, so don’t skip this step!
Step 4: Combine Ingredients
Now, it’s time to mix the wet and dry ingredients. Pour the wet mixture into the dry ingredients and stir gently until just combined. Be careful not to overmix; a few lumps are perfectly fine. This will keep your donuts light and fluffy!
Step 5: Color the Batter
Divide the batter into three bowls. Add a few drops of food coloring to each bowl—orange, purple, and green. Stir gently to create vibrant colors. This is where the magic happens! The kids will love this part, and it adds a festive touch to your donuts.
Step 6: Fill the Donut Pan
Using a spoon, carefully fill the donut pan with the colored batter. You can swirl the colors together for a marbled effect. Don’t overfill; leave a little space for the donuts to rise. It’s like creating little works of art!
Step 7: Bake the Donuts
Place the donut pan in the preheated oven and bake for 10-12 minutes. To check if they’re done, insert a toothpick into the center of a donut. If it comes out clean, they’re ready! The smell will be heavenly, trust me.
Step 8: Cool and Glaze
Once baked, remove the donuts from the oven and let them cool in the pan for a few minutes. Then, transfer them to a wire rack. While they cool, mix powdered sugar with a little water to create a glaze. Dip each donut into the glaze for that sweet finish!
Step 9: Decorate
Finally, it’s time to decorate! Add sprinkles on top of the glazed donuts for that extra festive flair. Let the glaze set for a few minutes before serving. Your whimsical Halloween donuts are now ready to be enjoyed!
Tips for Success
- Measure your ingredients accurately for the best results.
- Don’t overmix the batter; it should be slightly lumpy for fluffy donuts.
- Experiment with different food coloring combinations for unique designs.
- Let the donuts cool completely before glazing to prevent melting.
- Use a toothpick to check doneness; it should come out clean.
Equipment Needed
- Donut pan: Essential for shaping your donuts. If you don’t have one, a muffin tin works in a pinch!
- Mixing bowls: Use at least two for wet and dry ingredients. Any size will do.
- Whisk: Perfect for blending ingredients. A fork can work too!
- Measuring cups and spoons: For accurate ingredient measurements. A kitchen scale is a great alternative.
- Wire rack: Ideal for cooling donuts. A plate can substitute if needed.
Variations
- Vegan Version: Substitute eggs with flax eggs and use almond or oat milk for a plant-based treat.
- Gluten-Free Option: Swap all-purpose flour with a gluten-free flour blend for a celiac-friendly donut.
- Flavor Twists: Add a teaspoon of cinnamon or nutmeg to the dry ingredients for a warm, spiced flavor.
- Chocolate Lovers: Use chocolate glaze instead of powdered sugar for an extra chocolatey experience.
- Fruit Infusion: Mix in some mashed bananas or applesauce for added moisture and a hint of fruitiness.
Serving Suggestions
- Pair your whimsical Halloween donuts with a warm cup of apple cider for a cozy treat.
- Serve them on a festive platter, garnished with autumn leaves for a seasonal touch.
- For a fun twist, stack them high and drizzle with chocolate sauce.
- Include a side of whipped cream for dipping—kids will love it!
FAQs about Whimsical Halloween Donuts
Can I make these donuts ahead of time?
Absolutely! You can bake the whimsical Halloween donuts a day in advance. Just store them in an airtight container to keep them fresh. Glaze them right before serving for that perfect finish!
What if I don’t have a donut pan?
No worries! If you don’t have a donut pan, you can use a muffin tin instead. Just fill the cups about halfway and bake. You’ll have delightful donut holes instead!
How can I store leftover donuts?
Store any leftover whimsical Halloween donuts in an airtight container at room temperature for up to three days. If you want to keep them longer, consider freezing them!
Can I customize the decorations?
Definitely! Feel free to get creative with your decorations. Use different colored sprinkles, edible glitter, or even themed candy to match your Halloween party!
Are these donuts suitable for kids?
Yes! These whimsical Halloween donuts are perfect for kids. They’re fun to make and even more fun to eat. Just keep an eye on the sprinkles—they can get a bit messy!
Final Thoughts
Creating these whimsical Halloween donuts is more than just baking; it’s about making memories with your loved ones. The joy on my kids’ faces as they swirl the colorful batter is priceless. These donuts not only taste delicious but also bring a festive spirit to our home. Whether you’re hosting a Halloween party or just looking for a fun treat, these donuts are sure to delight. So roll up your sleeves, gather your family, and let the magic of baking fill your kitchen with laughter and love this spooky season!