

As a busy mom, I know how challenging it can be to find a snack that’s both delicious and nutritious. That’s where my Chocolate Protein Balls come in! These little bites of joy are perfect for a quick energy boost during those hectic afternoons. Packed with protein and a rich chocolate flavor, they’re a treat that even the pickiest eaters will love. Whether you need a post-workout snack or something to satisfy your sweet tooth, these protein balls are a delightful solution. Trust me, once you try them, you’ll want to keep a batch on hand at all times!
Why You’ll Love This Chocolate Protein Balls
These Chocolate Protein Balls are a game-changer for busy lifestyles! They’re incredibly easy to whip up, taking just 10 minutes of your time. Plus, they require no baking, which means less mess and more fun. The rich chocolate flavor will satisfy your cravings, while the protein keeps you feeling full and energized. Perfect for a quick snack or a sweet treat, they’re sure to become a family favorite!
Ingredients for Chocolate Protein Balls
Let’s dive into the delicious components that make up these Chocolate Protein Balls. Each ingredient plays a vital role in creating that perfect balance of flavor and nutrition.
- Rolled oats: These provide a hearty base, adding fiber and texture to your protein balls.
- Nut butter: Whether you choose peanut or almond, this creamy goodness adds healthy fats and a rich flavor.
- Honey or maple syrup: A touch of sweetness to bind everything together, you can adjust the amount to suit your taste.
- Cocoa powder: This is where the chocolate magic happens! It gives the balls that deep, rich chocolate flavor.
- Chocolate protein powder: Packed with protein, this ingredient boosts the nutritional value while enhancing the chocolatey goodness.
- Mini chocolate chips: These little morsels add bursts of sweetness and a delightful texture.
- Chopped nuts (optional): If you’re feeling adventurous, toss in some nuts for an extra crunch and flavor.
Feel free to customize your Chocolate Protein Balls with your favorite add-ins! You can find the exact measurements for each ingredient at the bottom of the article, ready for printing. Happy snacking!
How to Make Chocolate Protein Balls
Making Chocolate Protein Balls is a breeze! Follow these simple steps, and you’ll have a delicious snack ready in no time. Let’s get started!
Step 1: Combine the Base Ingredients
In a large bowl, combine the rolled oats, nut butter, honey, cocoa powder, and chocolate protein powder. I like to use a spatula for this part. It helps to mix everything without making a mess. The nut butter acts as a glue, holding all the ingredients together.
Step 2: Mix Until Well Combined
Mix everything until it’s well combined. This step is crucial! A thorough mix ensures that every bite is packed with flavor and texture. You want to see no dry oats or cocoa powder left behind. Trust me, your taste buds will thank you!
Step 3: Add Chocolate Chips and Nuts
Now, it’s time to add the mini chocolate chips and any chopped nuts you want. These optional ingredients bring an extra layer of flavor and crunch. If you’re feeling adventurous, try adding dried fruit or seeds for a twist!
Step 4: Roll into Balls
With clean hands, roll the mixture into small balls, about 1 inch in diameter. This is where the fun begins! If the mixture is too sticky, dampen your hands slightly. It helps shape the balls without sticking. Aim for uniform sizes so they all chill evenly.
Step 5: Chill to Firm Up
Place the rolled balls on a baking sheet lined with parchment paper. Refrigerate them for at least 30 minutes. Chilling is essential! It helps the balls firm up, making them easier to handle and giving them that perfect bite.
Step 6: Store Properly
Once chilled, store your Chocolate Protein Balls in an airtight container in the fridge. They’ll stay fresh for up to a week. If you want to keep them longer, you can freeze them! Just make sure to separate layers with parchment paper to prevent sticking.
Tips for Success
- Use natural nut butter for a creamier texture and better flavor.
- Adjust the sweetness by adding more or less honey or maple syrup to suit your taste.
- Experiment with different protein powders for unique flavors.
- Keep your hands slightly damp when rolling to prevent sticking.
- Store in the fridge for a quick grab-and-go snack!
Equipment Needed
- Large mixing bowl: A sturdy bowl for combining ingredients. A glass or metal bowl works well.
- Spatula: Perfect for mixing and scraping down the sides. A wooden spoon can also do the trick.
- Baking sheet: Use this to chill your protein balls. A plate can work in a pinch.
- Parchment paper: Helps prevent sticking. Wax paper is a good alternative.
Variations of Chocolate Protein Balls
- Peanut Butter Swirl: Use peanut butter instead of almond for a classic flavor twist.
- Nut-Free Option: Substitute sunflower seed butter for a nut-free alternative that’s just as delicious.
- Protein Boost: Add a scoop of your favorite superfood powder, like spirulina or maca, for an extra health kick.
- Fruit Fusion: Mix in dried fruits like cranberries or apricots for a chewy texture and natural sweetness.
- Spicy Kick: Add a pinch of cayenne pepper or cinnamon for a surprising flavor boost.
- Vegan Delight: Ensure all ingredients are plant-based, using maple syrup and vegan protein powder.
Serving Suggestions for Chocolate Protein Balls
- Pair with a glass of almond milk for a delightful snack combo.
- Serve alongside fresh fruit like banana slices or berries for a colorful plate.
- Drizzle with a bit of melted dark chocolate for an elegant touch.
- Pack them in lunchboxes for a nutritious treat on the go.
- Present on a cute platter for a fun family gathering or playdate.
FAQs about Chocolate Protein Balls
Here are some common questions I often hear about Chocolate Protein Balls. I hope these answers help you enjoy this delightful snack even more!
Can I make these Chocolate Protein Balls nut-free?
Absolutely! Just swap out the nut butter for sunflower seed butter or tahini. They’ll still be delicious!
How long do Chocolate Protein Balls last?
When stored in an airtight container in the fridge, they can last up to a week. You can also freeze them for longer storage!
Can I use a different sweetener?
Yes! Feel free to use agave syrup or even stevia if you prefer a lower-sugar option. Just adjust the amount to taste.
What’s the best way to store them?
Keep your Chocolate Protein Balls in an airtight container in the fridge. For longer storage, layer them with parchment paper and freeze.
Can I add protein powder flavors?
Definitely! Experiment with different flavors of protein powder, like vanilla or chocolate, to create your own unique twist on these tasty snacks.
Final Thoughts
Creating these Chocolate Protein Balls has been a delightful journey for me, and I hope it becomes one for you too! They’re not just a snack; they’re a little moment of joy in a busy day. Whether you’re fueling up for a workout or simply indulging your sweet tooth, these bites are sure to bring a smile. Plus, the best part? You can customize them to fit your family’s tastes! So, roll up your sleeves, gather your ingredients, and enjoy the process. Trust me, once you make them, you’ll wonder how you ever lived without them!
Print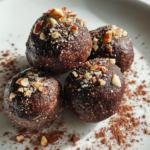
Chocolate Protein Balls: Discover the Perfect Snack!
- Total Time: 40 minutes
- Yield: 20 balls
- Diet: Vegan
Description
Chocolate Protein Balls are a delicious and nutritious snack packed with protein, perfect for a quick energy boost.
Ingredients
- 1 cup rolled oats
- 1/2 cup nut butter (peanut or almond)
- 1/4 cup honey or maple syrup
- 1/4 cup cocoa powder
- 1/2 cup chocolate protein powder
- 1/4 cup mini chocolate chips
- 1/4 cup chopped nuts (optional)
Instructions
- In a large bowl, combine rolled oats, nut butter, honey, cocoa powder, and protein powder.
- Mix until well combined.
- Add mini chocolate chips and chopped nuts, if using, and stir until evenly distributed.
- Roll the mixture into small balls, about 1 inch in diameter.
- Place the balls on a baking sheet lined with parchment paper.
- Refrigerate for at least 30 minutes to firm up.
- Store in an airtight container in the fridge for up to a week.
Notes
- Feel free to customize with your favorite add-ins like dried fruit or seeds.
- These can be frozen for longer storage.
- Adjust sweetness by adding more or less honey/maple syrup.
- Prep Time: 10 minutes
- Cook Time: 0 minutes
- Category: Snack
- Method: No-bake
- Cuisine: American