
Welcome to a culinary adventure that’s sure to spice up your dinner table! Crispy Rattlesnake Bites are not just a dish; they’re an experience waiting to happen. If you’re a busy mom or a professional juggling a million things, this recipe is a quick solution for a fun family meal. Imagine the delight on your loved ones’ faces as they take a bite of these crunchy, flavorful morsels. Trust me, this unique appetizer will impress even the pickiest eaters and make your weeknight dinners feel like a special occasion!
Why You’ll Love This Crispy Rattlesnake Bites
These Crispy Rattlesnake Bites are a delightful blend of ease and flavor. They come together quickly, making them perfect for busy weeknights or spontaneous gatherings. The crunchy exterior gives way to tender meat, creating a taste sensation that’s hard to resist. Plus, they’re a fantastic conversation starter! Your family and friends will be buzzing with excitement as they try something new and adventurous.
Ingredients for Crispy Rattlesnake Bites
Gathering the right ingredients is the first step to creating these mouthwatering Crispy Rattlesnake Bites. Here’s what you’ll need:
- Rattlesnake meat: The star of the show! Look for fresh, high-quality rattlesnake meat from a reputable supplier. It’s lean and packed with protein.
- Buttermilk: This creamy goodness is essential for soaking the rattlesnake. It tenderizes the meat and adds a subtle tang that enhances the flavor.
- All-purpose flour: This forms the crispy coating. You can substitute with gluten-free flour if needed, ensuring everyone can enjoy this dish.
- Garlic powder: A must-have for that savory kick. It adds depth to the flavor profile without overpowering the dish.
- Onion powder: This complements the garlic and brings a sweet, aromatic quality to the bites.
- Cayenne pepper: For those who love a bit of heat! Adjust the amount based on your spice tolerance.
- Paprika: This adds a beautiful color and a mild smokiness that rounds out the flavors.
- Salt and pepper: Essential for seasoning. Don’t skip these; they elevate the overall taste.
- Oil for frying: Choose a high smoke point oil like vegetable or canola oil for the best frying results.
For exact measurements, check the bottom of the article where you can find everything listed for easy printing. Happy cooking!
How to Make Crispy Rattlesnake Bites
Step 1: Soak the Rattlesnake
Soaking the rattlesnake in buttermilk is a game-changer. This step not only tenderizes the meat but also infuses it with flavor. The acidity in buttermilk breaks down the proteins, making the bites juicy and succulent. I usually let them soak for at least two hours, but if you can manage to do it overnight, even better! This little trick ensures that every bite is bursting with flavor, making your Crispy Rattlesnake Bites unforgettable.
Step 2: Prepare the Coating
While the rattlesnake is soaking, it’s time to prepare the coating. In a bowl, mix together the all-purpose flour, garlic powder, onion powder, cayenne pepper, paprika, salt, and pepper. This blend is where the magic happens! Each ingredient plays a role: the flour gives that satisfying crunch, while the spices add layers of flavor. I love to taste a pinch of the mixture to ensure it’s just right. This coating will create a crispy shell that perfectly complements the tender meat inside.
Step 3: Heat the Oil
Getting the oil temperature right is crucial for achieving crispy results. Heat your oil in a deep fryer or a large pot to 350°F (175°C). I recommend using a thermometer to monitor the temperature closely. If the oil is too hot, the bites will burn; too cool, and they’ll absorb excess oil. A good test is to drop a small piece of bread into the oil. If it sizzles and turns golden brown in about 60 seconds, you’re ready to fry!
Step 4: Dredge the Rattlesnake
Once the rattlesnake has soaked, it’s time to dredge it in the flour mixture. Remove the pieces from the buttermilk, allowing any excess to drip off. Then, coat each piece thoroughly in the flour mixture, pressing gently to ensure it sticks. This step is vital for creating that crispy texture we all crave. The more evenly coated they are, the better the crunch will be. I like to shake off any excess flour to avoid clumping.
Step 5: Fry the Bites
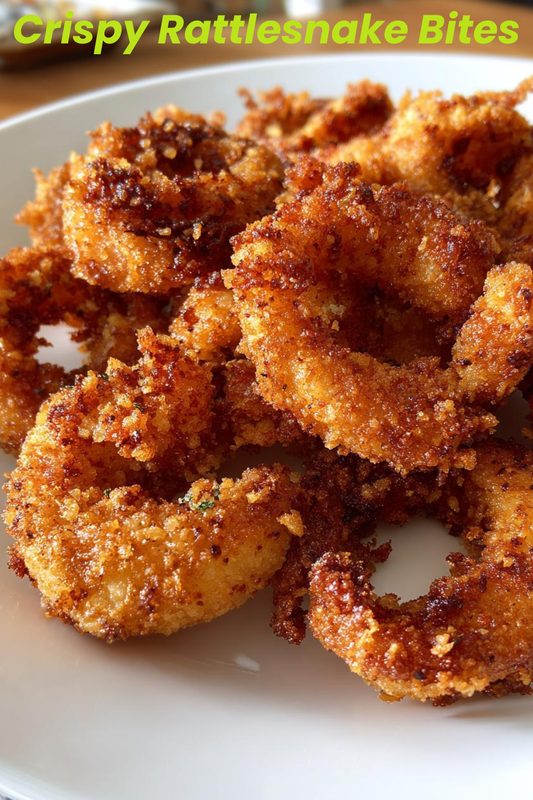
Now comes the fun part—frying! Carefully place the coated rattlesnake bites into the hot oil in batches. Fry them for about 3-4 minutes, or until they turn a beautiful golden brown. Keep an eye on them; you want that perfect crispy exterior. To check for doneness, the bites should float to the top and be firm to the touch. Once they’re done, use a slotted spoon to remove them from the oil.
Step 6: Drain and Serve
After frying, it’s essential to drain the excess oil. Place the crispy bites on a plate lined with paper towels to absorb any leftover grease. This step keeps them crispy and not soggy. Serve them hot with your favorite dipping sauce, like ranch or a spicy aioli. Trust me, these Crispy Rattlesnake Bites will be the star of your appetizer spread, and everyone will be coming back for more!
Tips for Success
- Always use fresh rattlesnake meat for the best flavor and texture.
- Let the meat soak in buttermilk longer for extra tenderness.
- Keep the oil temperature consistent to avoid greasy bites.
- Don’t overcrowd the pot while frying; this ensures even cooking.
- Experiment with different spices in the coating for a unique twist!
Equipment Needed
- Deep fryer or large pot: A deep fryer is ideal, but a heavy-bottomed pot works too.
- Thermometer: Essential for checking oil temperature; a candy thermometer is a great alternative.
- Slotted spoon: Perfect for removing the bites from the oil without excess grease.
- Mixing bowls: Use these for soaking and coating the rattlesnake.
- Paper towels: Handy for draining excess oil after frying.
Variations
- Spicy Jalapeño: Add finely chopped jalapeños to the flour mixture for an extra kick.
- Herb-Infused: Mix in dried herbs like oregano or thyme to the coating for a fragrant twist.
- Gluten-Free: Substitute all-purpose flour with a gluten-free blend to accommodate dietary needs.
- Cheesy Bites: Incorporate grated Parmesan cheese into the flour mixture for a savory, cheesy flavor.
- Sweet and Spicy: Add a touch of brown sugar to the coating for a sweet contrast to the heat.
Serving Suggestions
- Pair with a zesty dipping sauce like ranch or spicy aioli for an extra flavor boost.
- Serve alongside crispy potato wedges or a fresh garden salad for a balanced meal.
- For drinks, consider a light beer or a refreshing lemonade to complement the bites.
- Present on a rustic wooden board for a charming, inviting display.
FAQs about Crispy Rattlesnake Bites
Can I use frozen rattlesnake meat for this recipe?
Yes, you can use frozen rattlesnake meat! Just make sure to thaw it completely in the refrigerator before soaking it in buttermilk. This ensures even cooking and helps maintain the meat’s tenderness.
What does rattlesnake meat taste like?
Rattlesnake meat has a mild flavor, often compared to chicken or fish. It’s lean and slightly gamey, making it a unique choice for adventurous eaters. The spices in the Crispy Rattlesnake Bites enhance its natural taste beautifully.
How can I make these bites less spicy?
If you prefer a milder flavor, simply reduce the amount of cayenne pepper in the coating. You can also omit it entirely and add more paprika for a smoky flavor without the heat. Adjusting the spices allows you to customize the dish to your taste!
What dipping sauces pair well with Crispy Rattlesnake Bites?
These bites are delicious with a variety of dipping sauces! Ranch dressing, spicy aioli, or even a tangy barbecue sauce work wonderfully. Feel free to get creative and try your favorite sauces!
Can I prepare the batter in advance?
Absolutely! You can prepare the flour mixture ahead of time and store it in an airtight container. Just remember to coat the rattlesnake pieces right before frying for the best texture and crunch.
Final Thoughts
Creating Crispy Rattlesnake Bites is more than just cooking; it’s about sharing a unique experience with your loved ones. The joy of watching their faces light up as they try something new is priceless. This recipe brings a sense of adventure to your kitchen, transforming an ordinary meal into a memorable occasion. Plus, the delightful crunch and burst of flavor will have everyone coming back for seconds! So, gather your ingredients, roll up your sleeves, and embark on this culinary journey. Trust me, you’ll be glad you did, and your family will thank you for it!
Print
Crispy Rattlesnake Bites: A Flavor Adventure Awaits!
- Total Time: 2 hours 15 minutes
- Yield: 4 servings
- Diet: Gluten Free
Description
Crispy Rattlesnake Bites are a unique and adventurous dish that offers a delightful crunch and a burst of flavor, perfect for those looking to try something new.
Ingredients
- 1 pound rattlesnake meat, cut into bite-sized pieces
- 1 cup buttermilk
- 1 cup all-purpose flour
- 1 teaspoon garlic powder
- 1 teaspoon onion powder
- 1 teaspoon cayenne pepper
- 1 teaspoon paprika
- Salt and pepper to taste
- Oil for frying
Instructions
- Soak the rattlesnake pieces in buttermilk for at least 2 hours.
- In a separate bowl, mix flour, garlic powder, onion powder, cayenne pepper, paprika, salt, and pepper.
- Heat oil in a deep fryer or large pot to 350°F (175°C).
- Remove rattlesnake from buttermilk and dredge in the flour mixture until well coated.
- Fry the rattlesnake bites in batches until golden brown and crispy, about 3-4 minutes.
- Drain on paper towels and serve hot.
Notes
- Ensure the rattlesnake meat is sourced from a reputable supplier.
- Adjust the spice levels according to your preference.
- Serve with a dipping sauce for added flavor.
- Prep Time: 2 hours
- Cook Time: 15 minutes
- Category: Appetizer
- Method: Frying
- Cuisine: American